


It used to look (shamefully) like this:............But lately it looks (mostly) like this:
 versus
------Mess.....................................versus.........................................Bliss
Do you find crafty cleaning to be a guilty pleasure?
For the last year or so (since we moved) I've been putting more time, bit by bit, into the space and have almost stopped feeling guilt over that. (I've always felt like I should be crafting & blogging tutorials or doing general house-keeping instead of prettifying my craft studio, but having a clean space feels oh so NICE!)
The lay of the land:
The space is about 8 foot by 9 foot. It's the master bedroom of our 700 sq foot condo (she says with a guilty snicker of happiness). The furnishings were done on the cheap [using pieces we already had: 99% mismatched Ikea beaver-puke (particleboard) pieces] ;o). And it's a blissful thing to have "a room of one's own!"
I thought I'd include a pictorial here of one of the little projects that has added to the organized bliss: ink labels...

My Sweetheart spoiled me with 8 new Distress inks and other goodies for ye olde upcoming birthday. (He keeps teasing me about almost being 40 and calls me "OLD." Can you imagine!?! I'm a spring chicken! :O) His thoughtfulness makes up for his sassy nerve, though.)
Don't crafty gifts make getting older a little bit easier? I never shop anymore except on holidays, so it's an extra big thrill. (I will love these inks that much more: talk to them, feed them and water them, give them goofy nicknames, pet them! teeheehee). Thanks, Honey!

1...pictorial for making distress ink labels
2...a break down of my craft studio corner: "colour shelf"
3...some ideas for curtains: 2 kinds for a creative closet
4...pencil sharpener storage idea

(love up your inks)
make Distress ink labels:


- inks you want to label
- paper (i love Paris Bleedproof)
- computer & ink jet printer
- clear embossing powder & heat gun
- strong double-sided tape
- wax paper or acetate (or something similar)
- water & a rag
- Microglaze or other sealer

Step 1} Make Do It Yourself label "stickers":
A) Print the labels with ink names. I wanted four of each name so that all sides of the ink pad are labeled, that way I can just shove them back on the shelf willy-nilly.
For labels that won't smudge: heat-emboss label names onto paris bleedproof paper (using an inkjet printer or print on a lazer printer if you have it.
B) Cut the labels and adhere them to wax paper with strong double-sided tape.
C) Adhere the label "stickers" to a piece of wax paper temporarily to make them easy to ink & work with.
Hopefully you can see why I like the paris bleedproof paper in this photo
(it let's you heat emboss the printer ink!)
(You can read more about that digital embossing technique here if you like).

Can you see how the letters are slightly raised? That's clear embossing powder & it means no smearing when you ink it up:

Step 2} Ink the labels. I applied the matching distress ink colours direct to paper and then blended with a little water.

Step 3} Seal the labels so they will stay nice & clean and not absorb other colours of ink when you work. I used Judikin's Microglaze. It's got a nice waxy quality that makes it a good waterproofer. I rubbed off the excess with a rag. Alternatively, you could use mod podge, gel medium, or another clear sealer. Just be sure not to stick the labels permanently to the wax paper, of course. ;o)
and there you have it...

Custom ink labels.
Step 4} Then simply stick them on the ink pads (all four sides):
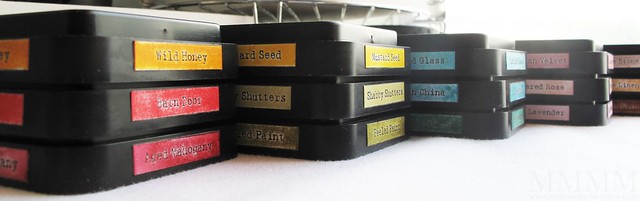
...and here's the shelf where they live,
with their close neighbours the other inks
(sorted into rainbow-ness):
with their close neighbours the other inks
(sorted into rainbow-ness):

They are all on old shelves (20 bucks a piece back in the day).
I wasn't worried about damaging the shelves, so the
scissors hang on push pins that are stuck everywhere to
hang things from. It's so nice to have everything within easy reach.
The shelves are conveniently located at the left of my main work desk:

They are actually along the inside of the closet
(I needed the space, so I took the doors off)
(for 2 curtain layers in a closet)
One convenient thing is that I put up a curtain rod,
high up in side the closet, so that it can all
be closed off for a more clean look.
Hopefully this picture also gives you a better idea of
how the desk is arranged in the closet area:

(The desk is stuck into the closet so that part of it is
tucked away against those shelves
& the curtains hide the shelf of hoard-y goodness.
It's a beveled glass piece from an old broken Ikea coffee table
on top of a junky drafting table hidden with a vintage table cloth.
Working on glass is a joy, since it cleans up ever so easily.)
The other gray shelf there blocks a big bright window
which may seem crazy but is actually a good thing since it not only
increases storage, it also affords a little privacy from
my hundreds of neighbours who are in the condos right out there.
You can see into peoples' places across the way alarmingly clearly.
(Translation: secretly stamping in my pajamas!)
There are extra sneaky curtain clips left empty between
the ones that are holding those white curtains:

Why? The spare clips make it so that I can quickly clip up a
painter's drop sheet that will serve to protect the clean curtains
when I get to painting large canvases etc. (Eventually!)
Here are some other things that live on the shelves:
They are actually along the inside of the closet
(I needed the space, so I took the doors off)

(for 2 curtain layers in a closet)
One convenient thing is that I put up a curtain rod,
high up in side the closet, so that it can all
be closed off for a more clean look.
Hopefully this picture also gives you a better idea of
how the desk is arranged in the closet area:
(The desk is stuck into the closet so that part of it is
tucked away against those shelves
& the curtains hide the shelf of hoard-y goodness.
It's a beveled glass piece from an old broken Ikea coffee table
on top of a junky drafting table hidden with a vintage table cloth.
Working on glass is a joy, since it cleans up ever so easily.)
The other gray shelf there blocks a big bright window
which may seem crazy but is actually a good thing since it not only
increases storage, it also affords a little privacy from
my hundreds of neighbours who are in the condos right out there.
You can see into peoples' places across the way alarmingly clearly.
(Translation: secretly stamping in my pajamas!)
There are extra sneaky curtain clips left empty between
the ones that are holding those white curtains:
Why? The spare clips make it so that I can quickly clip up a
painter's drop sheet that will serve to protect the clean curtains
when I get to painting large canvases etc. (Eventually!)
Here are some other things that live on the shelves:

And this is another one of those little random organizing
things that makes me strangely happy.
A pencil sharpener & shavings holder:
things that makes me strangely happy.
A pencil sharpener & shavings holder:

It's a little tray that fits in the palm of your hand
(but really it's a lid from an antique bell jar)
It makes for a great thingamabobber to sharpen pencils in.
Works to catch the shavings for dumping in the garbage bin later.
It's glass, so it has a lovely heft to it, but any little container would do.
(but really it's a lid from an antique bell jar)
It makes for a great thingamabobber to sharpen pencils in.
Works to catch the shavings for dumping in the garbage bin later.
It's glass, so it has a lovely heft to it, but any little container would do.
What's your organizing style?
Things work better, I find, if I plan for my style of organizing (slightly lazy with a chance of intermittent cleaning sprees. Kind of like the weather. In other words, I often save my cleaning for a rainy day--As you know, it used to be that I saved it for a blue moon!) ;o)
Well, thanks for letting me ramble!
Hope you are feeling wonderful.


0 comments:
Post a Comment