StampznewBright

  • Subscribe to our RSS feed.
  • Twitter
  • StumbleUpon
  • Reddit
  • Facebook
  • Digg

Friday, 31 December 2010

Winter B-day Basket (à la Mo) + a wee CATastrophe

Posted on 00:01 by Unknown
a playful image....

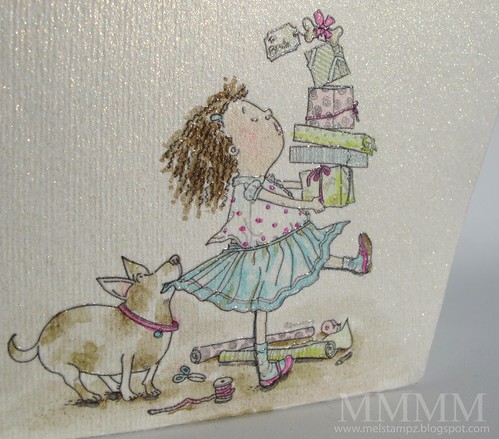
detail bronte wants it now

....printed and embossed on a basket:

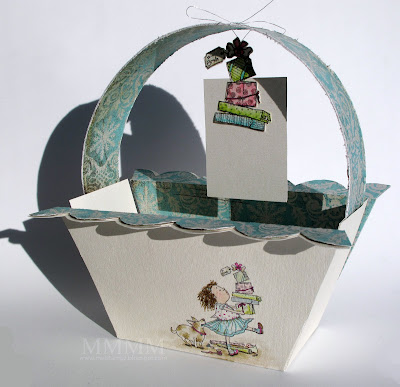
Mo's Digital Pencil Bronte Wants it Now basket by mel stampz
(to wrap a winter birthday gift)

...and a little perty on the inside:

Bronte Wants it Now basket INSIDE

The full-view picture of this basket up there is kind of botched,
but I have a good excuse, I swear! ;o) Can you guess what it is?...


teeheeheehee


1...the image
2...how-to add images to a 3D box template
3...in a word, catastrophe
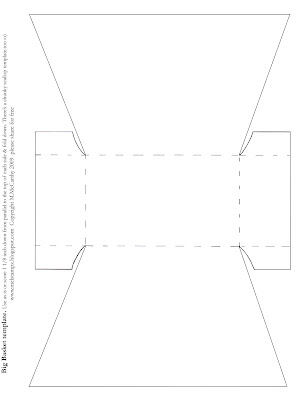
4...free template for a BIG Basket (an oldie)
-1-


Mo's Digital Pencil Bronte Wants it Now
(A flexible image since it's adorable for Christmas or birthdays.)
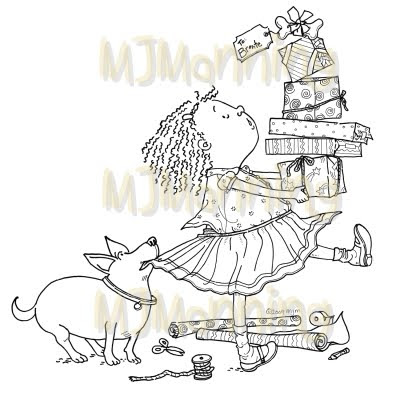


It was fun to cut the gift stack out digitally and use it as an element
for the tag & inside of the basket too. (Bonus!) ;o)

-2-


Print a digital image on a 3D template
& build this basket

This cheap trick of printing your image at the same time as
you print a 3D template might be a fun way to do several
treat-bags for a child's birthday party. Faster than stamping!


  • Digital image Mo's Digital Pencil Bronte Wants it Now
  • Candido Incandescent cardstock
  • Clear embossing powder, & heat gun
  • Copic Markers
  • BasicGrey snowflake paper (retired)
  • Silver thread
  • Adhesive
  • A crazy cat

Step 1) Add the image to the template file:


1A) Open the digital image of your choice (You could use free clip art or colouring pages. Your own doodle or a child's drawing would be so special for this!)

1B)You could paste the image sized as it is, or you could turn the image into a photoshop brush to have control over the size. (I always like to make sure I label photoshop brushes that are made this way with the artist's name so I can always make sure to follow copyright and give due credit) :o)

Front & back: I used Photoshop, and rotated the image to get it printed right-side-up on the front & back of the basket.


Step 2) Print the image & emboss it, if you like. This Candido Incandescent cardstock from Paper Temptress is embossable straight out of the printer [using clear embossing powder and a heat gun (just print in an inkjet printer (the high quality setting is usually perfect); then, sprinkle the embossing powder quickly when it comes out of the printer & heat set with the heat gun.]


Step 3) Score, and cut out the the basket. The blue lines, in the photo above, indicate the score lines.


Step 4) Print, score, cut & assemble a liner out of patterned paper. (To get a liner, for any box, I just print it again at 98.5%)


Step 5) Colour the image with Copic markers (or whatever you prefer).

If you are using the
Candido Incandescent cardstock from Paper Temptress to emboss, you will want a marker with some permanence, since it is glossy and water-based markers might not set well on it.

Copics
work wonderfully on it, since they float and are very forgiving. (You can even go back and fix colouring "mistakes" days later)

AND the incandescent cardstock gives your
copic colours a pretty sparkle:


(The watercolour paper texture of it is nice too.)


Step 6) Assemble the basket and its bits:

6A) Fold & adhere the basket.

6B) Add the liner to the inside of it.

6C) Create 4 side pieces for the basket (The sides aren't included on the template in order to get a BIG basket in the printer on a 8.5" wide paper, but they're just plain rectangular pieces that are easy to cut).

To make the sides, cut 4 pieces of cardstock to measure:
2 and 6-8 inches by
just a hair under 2 and 1-2 inches


I also added images inside of the basket by using photoshop:


A) Cut the stack of gifts from the image digitally.
B) Make a copy of it reversed for the other side of the basket (inside)
C) Print & cut the 4 ide pieces (2 patterned 2 plain)
D) Attach the 4 side pieces to the basket

(P.S. Can you see the "foreshadowing of imminent catastrophe" in the photo above? HINT: Furry Mouse shadow.... giggle giggle)


Step 7) Make a matching tag:


8A) Print 2 of the gift stack image on more Incandescent cardstock, emboss them, & colour them in.
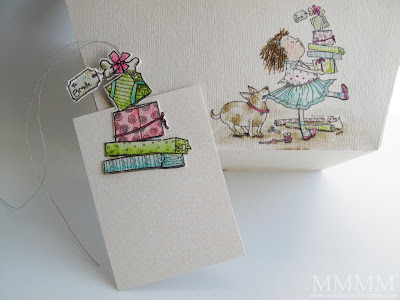


8B) Adhere the two images to a piece of cardstock (sandwiching silver thread inside to make a string for the tag)

And then, you have a gift basket & tag:


with that cute image on the front & back:


perfect for a little someone to sabotage...


"catastrophe"

Someone
decided to crawl right into this basket:


and she went straight through!:


(no kitties were harmed in the mauling of this basket)

She even got the tag in her mouth & sat in the basket
for a second
; man, I wish I got a shot of that!

Do you think Mouse may have a thing against dogs?:

hehehe

-4-

for a BIG Basket

There's a tutorial with details on how to
assemble the basket template here

and


Please click this link if you'd like to
download the templates

(or click the photos for JPG versions):


I printed this one with no dotted lines right
onto the cardstock & patterned paper for this project:
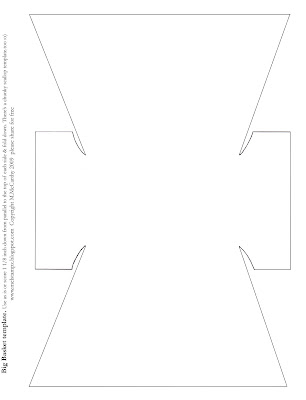


When finished, the basket measures:
  • width: 6" (at the basket top) and 4 2/8" at the basket bottom
  • height: 2 6/8" (for the basket height) and (7" high, with the handle)
  • depth: 2 1/2" (from basket front to basket back)
To make sides cut 4 pieces to measure:
2 and 6-8 inches by
just a hair under 2 and 1-2 inches


Thanks for visiting!


P.S. Thank you so much for your kind well wishing,
C is still in relative agony but healing more & more each day!

P.P.S. This post is unsolicited, but I was formerly on the
design team for Mo's Digital Pencil & Paper Temptress, two fabulous ladies!
Read More
Posted in 'Mouse'-the-cat, *TEMPLATEs, 3D-projects, cheap-tricks, Freebies, Mo's-Digital-Pencil, Paper-Temptress | No comments

Thursday, 30 December 2010

Merry Christmas ???

Posted on 13:49 by Unknown
Your Christmas is long gone, but
I've been nursing a severely injured hubby,
so this is the first chance I had to pop in.

So, Merry belated Christmas
to You and Yours!

and
Happy early New Year!


I wanted to say Merry Christmas on the day itself, but C had a very bad fall on an escalating ramp 2 days ago, ruptured his patellar ligament & had to have emergency knee surgery.

His mom is here & she's been nothing short of a miracle worker. C has been a sweetheart. He was in so much pain & it's been very frightening, but we had a really great surgeon who specializes in knees (with the emergency nature of his patellar rupture they had to act quickly, so he could have got the hand/wrist specialist!)

So many things went well that could have gone wrong, so though he is in a world of hurt, we are feeling very very grateful.

Chat with you soon!
:o)
Mel

P.S. Do ya want a giggle? In all this uproar,
this one decided it was time for her first very loud heat:

We haven't been able to have Miss Mouse the cat fixed, since she
has such severe allergies to medications. Thankfully she lives
on the 18th floor (far away from the boys!) LOL.

She makes the best nurse though, hey? :o)
Read More
Posted in | No comments

Wednesday, 22 December 2010

Let it Snow card & Claire Keay's digital images

Posted on 12:01 by Unknown
Claire Keay Girl & Dog mel stampz

Are you a little bit procrastinatey?
Are ya through making Christmas or winter cards?

When everyone else seems to be heaving a great big *SIGH* of
relief at not having to see another Christmas card post, I'm just getting
started blogging them. What can I say? ....."And the ultimate
procrastinator award goes to...." (who moi? nah!) ;o)

Hopefully, this card might give you an idea for a last-last-last-minute project.
(and you're not too too tired of winter cards!) :o)

-1-

digital image of the girl & her dog

Have you ever met the Loveosaurus?

MFT Loveosaurus diorama INSIDE
(tutorial & digital kit freebie for this diorama here)

Loveosaurus is an MFT stamp drawn by the artist Claire Keay.
The Girl & Dog image on today's "Let it Snow" card is by her too,
but today's image is digital!

You can find Girl & Dog here.
&Link
she has a lovely site called JellyPark here

claire keay girl & dog close up by mel stampz

The snow is made with seed beads (sewn on).

To make this little gal & pup I did this schtuff:

Step 1) Resized her to print smaller.

Step 2) Embossed her from the digital printer (using white cardstock that I painted a thin amount of Matte Medium on. More about that technique in a tutorial here.)

Step 3) Drew a line in pencil across the ground (to make the side walk).

Step 4) Cut with an exacto blade between her & the doggy. Cut around them.

Step 5) Coloured them with copic markers (colours are all listed under materials below used white gel pen on the sidewalk, her coat & siver on her buttons and the dog's tag.

Step 6) Cut a label background out of dotted GCD paper (Spellbinders Nestabilities label 9)

Step 7) Cut a mat the same size out of vellum cardstock (to layer over & tone the dots down)

Step 8) Stuck the vellum over the dots, pierced two holes beside the dots to sew on pearl seed beads for snow.

Step 9) Pierced holes and stitched around her with pink thread.

Step 10) Cut a larger nesties label out of blue, pierced holes, coloured the edge with black copic, stitched with silver (filled in every other stitch with silver gel pen).

Step 11) Cut a bit of fuzzy paper with the labels nine die & trimmed it to look like snow.

[In hindsight, it'd be a whole lot easier to add the sidewalk & dots in digitally
in Photoshop (my DUH!)] ;o)


The bow is embellished with a snowflake punched
out
of that fuzzy paper & a clear button...

girl and dog card fuzzy snowflake box & diy paper mel stampz

-2-


print only tiny pieces of DIY digi paper:

The black snowflake patterned paper (under the bow) above
is a bit of homemade digital cardstock (which might
seem crazy if you think about the amount of ink, but if
you just print little wee squares of it, it's not a lot of ink!)

I sized my paper to be 1 inch by 6 inches in Photoshop
& erased the center of it:


It was made using Hero Arts Tiny Snowflakes digital set
(as photoshop brushes on a black background)
Of course, if you don't like black you could make any colour... ;O)

and here's the inside of the card:


super simple....


And here's the déjà vu spot
(Clickable blogger pics):


Digital image: Claire Keay Girl & Dog

Paper: Pink lattice digi paper (set 51) from tada TracyAnnDigitalArt on etsy here
Pink & Blue & White cardstock, Watercolour paper (to emboss in Cuttlebug)
Vellum cardstock (to layer over dotted paper--GCD Party it Up collection)

Colour: Copic markers: E50 eggshell; E00 skin white; BG72 ice ocean; BG10 cool shadow; R85 rose red; RV02 sugared almond pink; cool grays: C1, C3, and C7. Black copic marker (for the faux mat) (If you think you might try the matte medium digital embossing, please see this tutorial for a disclaimer on digi embossing & copics.) :o)

Miscellaneous: paper piercing tool, needle, pink & silver thread, tiny white pearl beads,
Provocraft Winter Wonderland embossing folder set (Snowflakes); silver & white gel pens;
Fuzzy paper for snow (a gift from my BF Kimmy sorry no source);
Martha S. snowflake punch, clear button, white organza & black lace ribbon.


Hope you're having a week filled with belly laughs or
happy tears, or whatever mood makes you feel just so!


Read More
Posted in Claire-Keay, Cuttlebug, Digital-Images | No comments

Monday, 20 December 2010

photo-faced snowman card: Last minute Christmas card idea

Posted on 14:00 by Unknown
Do you have friends who have
outrageously gorgeous children?


We do!
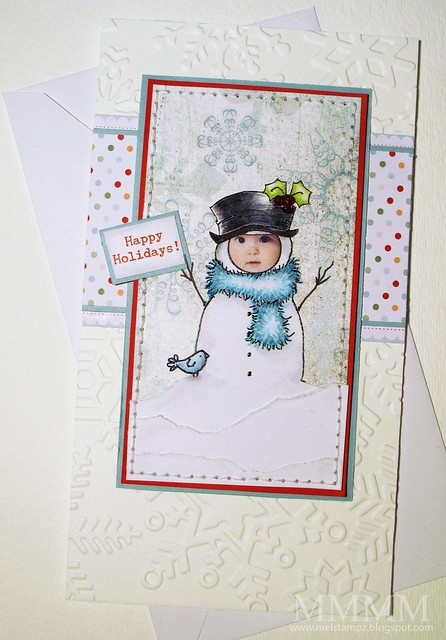
and here he is all dressed up as a snowman:

Hayden as a snowman (mel stampz)
giggle! giggle! giggle!
That wee face is so cute, I can never get over it.


How to make your own photo-faced snowman:

1) Scan a photograph or work with one that you have on your computer
2) Using photoshop (or other software) cut & paste a face onto a digital image/clipart.
3) If needed, use the digital eraser to clean up the image (layers in PS are great for that!)
4) Print & colour your image

Not into digital photo manipulation?
Of course you could add a photo the old fashioned way,
with a punch & some glue:

This older tutorial of mine shows you some ideas for how to add photos to snowman treat boxes (and there are free templates there), but that punch method would work for a digital image like this one as well....

baby hayden as a snowman 2010

I pasted Hayden's sweet cherubic little face over this
digital snowman image by Heather Ellis.

You may notice that the image is changed a little, since I wanted a patterned paper sky behind him... I drew the arms on with a permanent marker & put a little sign in his hands...

...and The little bird is from another different Heather Ellis snowman image.
I cut him out digitally, reversed his orientation, printed him,
& cut him out, etc.. :o)

AND

I felt like I got a big Christmas gift when I discovered that some special marker paper I had bought embosses beautifully in the ink jet printer!!!

so..... a bit of rambling under the heading of...

(i'm flipping out about this!)

Digital inkjet Embossing a new EASY way,
with no wet mediums
or potential clogging of markers

baby hayden embossing

WHAT? This image Digitally embossing an image from the ink jet printer... (Which really helps prevents blurring when colouring with markers & gives that lovely embossing feeling & look to your digital images.)

However,
a couple of You have had trouble with my Matte Medium digital embossing method. And what I didn't like about it was the potential it had for clogged copics (You may recall that tutorial with the oh so scary disclaimer?) ;o)

WHY? I'm not sure why (is it your printer brand? your ink variety?
your paper? your matte medium? OR my crazy instructions? ;o) Who can say?)

BUT I found an easier way you just might love--- with no wet art medium, so had to tell you about it right away. After all, you might get a gift certificate for Christmas & want to add this to your list of supplies to try.

WHAT (already)!?!


Borden & Riley #234 Paris Bleedproof 108lb paper for pens
[The new love (commodity fetish) of my life!] ;o)

$ wise: It works out (for me having paid 9.99 here in Canada
at Curry's online) to be approximately 25 cents a sheet.


WHERE? You should be able to find this in most art supply stores--especially those that sell markers. It's also readily available online. In Canada, I found it online here at Curry's (no affiliation) ;O)

Emboss a Digital Image:

Step 1) Have all the supplies ready, so that you can work quickly. (Clear embossing powder, a tray, & heat gun & Paris Bleedproof paper cut to size.)

I like to cut the paper to be about 8 1/2 inches by 6 inches so it comes out of the printer in less time, but it will depend upon the size of the image, and you may find you don't need the extra time.

Step 2) Print the image on the Paris Bleedproof paper:

A) Set the INK JET printer: the highest quality setting should work best, but it will depend on your printer. I've had success with standard (or mid quality setting as well). The aim is to get enough ink on & let the ink to stay wet enough to hold the clear embossing powder.

B) Print the image and....

C) Grab the paper quickly when it comes out of the printer

You can print in black & white (shades of gray) or any colour! (Clear embossing powder will give you embossing in any colour you can print in--even for photographs or multiple colour images.)

Step 3) Hit it with clear embossing powder. As soon as the image comes out of the printer, sprinkle embossing powder on & Heat to set the embossing powder to melt it. I prefer "detail clear embossing powder" since it's more fine and seems to stick better).

You can also experiment with other colours or types of embossing powder, of course.

Please Note: Results may vary with your printer & ink type and even with the humidity levels in your geographical area. (Weird hey?) A little experimenting is always helpful if you're having trouble, please don't hesitate to comment/email. :o)

COLOURING with Copics:

The paper is a favourite of many marker artists, because the ink floats a little on the paper's surface so it is easier to use and get neat effects with. (Though everyone has different taste or preference when it comes to papers & Copic markers, of course, so the bit of "float-ability" might not be your style...) Personally, I adore it. :-D


The beads are stitched on to the berry part of the holly image:
baby hayden beaded holly
The beads look gargantuan here,
but of course they are teensy weensy seed beads. :-)


clickable blogger pics of the card:

embossing:

beads:


I hope that the New Year brings you all the most joy imaginable!
&
A very Merry Christmas to those who celebrate it. May the year be
full of blessings for you and your loved ones!


P.S. In case you wonder, this post is completely unsolicited
from start to rambling finish. Just schtuff i love! :-D
Read More
Posted in cheap-tricks, Christmas, Digital-Images, Faves, Heather Ellis, techniques, Tutorials | No comments
Newer Posts Older Posts Home
Subscribe to: Posts (Atom)

Popular Posts

  • free Butterfly Silhouette .studio cut files (in 3 styles)
    Hi, All! Here are those butterfly Silhouette .studio cut files. They are for only for the Silhouette machine... But I do hope to share other...
  • DIY digital paper (some freebies)
    The lull in posts (over the last couple of days) was for me to finish up this looooong post I've been wanting to share with you for eons...
  • New Popcorn Box template set (pretty stamp room storage) :o)
    Are you in the mood for a template or two? I was going to wait until I had really good photos and a full pictorial, but then I would take fo...
  • Missing with a migraine, Craft room BEFORE pics, & LINKs for Organizing the craft room
    Edited to add: Sorry guys. I feel like I was hit by a truck. Migraine's lasted so long... but I will be back with a post by tomorrow eve...
  • Graphics Fairy Inspiration (+vintage printables)
    Thank You all so much for your wonderful comments about the papers I've been obsessed with. Your kind words make me grin so big that I g...
  • "Honey, I shrunk the stationery!" (Hero Arts typewriter notebook)
    Still trying to make more of my cards into little gifts. This Hero Arts typewriter card is another take on the card turned refillable notebo...
  • 3 Clean And Simple cards (with SRM stickers)
    You guys may know that I was tragically born without the gene that let's you achieve a C lean A nd S imple card. ;-) Not sure why I find...
  • Making Your Own Colour Shimmer Sprays--Links & Info
    Info & Links Links for how to Mak e yo ur o w n Sh im mery s prays: (These are for you sweet Beth! oxo) ( more info on these colours in...
  • over 100 free pattern overlays ... at a glance
    Would you believe that the free overlay total is at 139 overlays and counting? (I might have a wee little addiction) ;-) Since overlays can ...
  • Felt-based cards (Rock-a-Bye Baby tutorial)
    New idea, Old projects.... I've been debating whether or not to post some older projects/tutorials since the big bad insecurity beast...

Categories

  • 'Mouse'-the-cat (10)
  • *TEMPLATEs (98)
  • 3D-projects (144)
  • A-Day-For-Daisies (7)
  • Amber Ink (9)
  • Angel's-Landing (2)
  • BASICS (47)
  • Blogging-tips (7)
  • Caardvarks (48)
  • Cat's-Pajamas (2)
  • cheap-tricks (224)
  • Christmas (33)
  • Claire-Keay (2)
  • Cricut (3)
  • cut-file (2)
  • Cuttlebug (45)
  • decor (6)
  • Digital-Images (131)
  • Distress-Inks-etc (14)
  • DIYstamps (1)
  • Eat-Cake-Graphics (11)
  • Faves (207)
  • Fred-She-Said (5)
  • Freebies (77)
  • GESSO (9)
  • Halloween (10)
  • Heather Ellis (3)
  • Hero-Arts (14)
  • ISC (7)
  • Jessica-Sprague (2)
  • Just-Rite (2)
  • LPS (63)
  • Mo's-Digital-Pencil (16)
  • My-Favorite-Things (33)
  • organizing (7)
  • Other-People's-Tutorials (36)
  • Paper-Garden-Projects (54)
  • Paper-Temptress (39)
  • Punches (21)
  • Purple-Onion-Designs (23)
  • S.U. (1)
  • SCOR-PAL (4)
  • silhouette (4)
  • Skipping-Stones-Design (7)
  • Squigglefly (6)
  • SRM-Stickers (8)
  • techniques (191)
  • templates (26)
  • Tiffany-Doodles (4)
  • Tutorials (252)

Blog Archive

  • ►  2013 (16)
    • ►  July (4)
    • ►  June (4)
    • ►  May (3)
    • ►  April (1)
    • ►  March (1)
    • ►  February (3)
  • ►  2012 (53)
    • ►  December (2)
    • ►  November (2)
    • ►  October (1)
    • ►  August (3)
    • ►  July (2)
    • ►  June (5)
    • ►  May (7)
    • ►  April (8)
    • ►  March (9)
    • ►  February (13)
    • ►  January (1)
  • ►  2011 (74)
    • ►  December (1)
    • ►  November (5)
    • ►  October (10)
    • ►  September (9)
    • ►  August (12)
    • ►  July (5)
    • ►  June (9)
    • ►  May (2)
    • ►  April (6)
    • ►  March (7)
    • ►  February (4)
    • ►  January (4)
  • ▼  2010 (84)
    • ▼  December (7)
      • Winter B-day Basket (à la Mo) + a wee CATastrophe
      • Merry Christmas ???
      • Let it Snow card & Claire Keay's digital images
      • photo-faced snowman card: Last minute Christmas ca...
      • Just Missing You! (damask digi paper freebie & tut...
      • new 2010 videos: Holiday Thinking Inking (linking)
      • 'Twas the night before Christmas...
    • ►  October (1)
    • ►  September (6)
    • ►  August (1)
    • ►  June (1)
    • ►  May (7)
    • ►  April (21)
    • ►  March (3)
    • ►  February (17)
    • ►  January (20)
  • ►  2009 (234)
    • ►  December (16)
    • ►  November (21)
    • ►  October (11)
    • ►  September (23)
    • ►  August (29)
    • ►  July (26)
    • ►  June (10)
    • ►  May (16)
    • ►  April (26)
    • ►  March (22)
    • ►  February (27)
    • ►  January (7)
  • ►  2008 (39)
    • ►  December (14)
    • ►  November (25)
Powered by Blogger.

About Me

Unknown
View my complete profile