StampznewBright

  • Subscribe to our RSS feed.
  • Twitter
  • StumbleUpon
  • Reddit
  • Facebook
  • Digg

Tuesday, 21 September 2010

Welcome to the Neighbourhood! (Stamping with Die-namics Clouds)

Posted on 12:20 by Unknown
Squigglefly Whimsy Town by mel stampz

I'm still taking it easy around here & thank you ever much for your fabulous comments. I absolutely loved reading about how you make & save or send your cards. (Some brilliant pointers in those comments, hey?) I especially needs to find me a wholesale whack of bubble-mailer-envelopes! ;o)

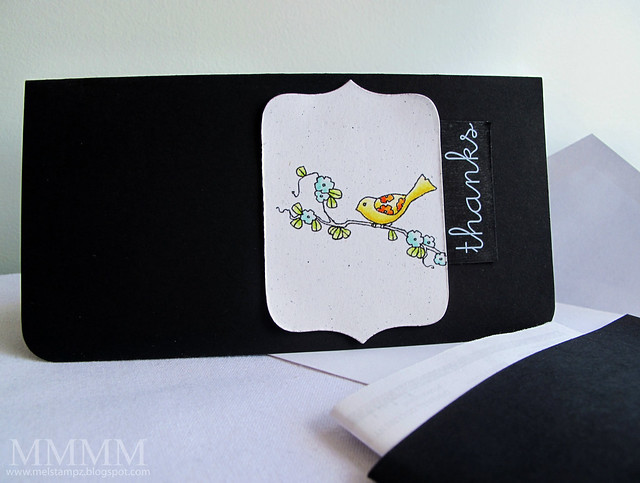
This card is another simple one... for friends of ours who have moved to our neighbourhood. We're so excited that they live here now! Here are the details of how it was made...


The image is called
Whimsy Town by artist Angie Davis
I bought it at Squigglefly ( for $2)!

CLOSE Squigglefly digital houses image Whimsy Town by mel stampz

The town: As soon as I saw the weensy cat, bike, & birds, I knew I had to live in this little town. The digi image is heat-embossed again (on Matte Medium. Can't use a digital image without doing that.)

Do you love heat-embossed images?

Embossing DETAIL Squigglefly Whimsy Town by mel stampz

If you'd like to see a full tutorial on how to achieve heat-embossed digital images (using an ink-jet printer) please see this post (& if you think you might try it out, please read the "disclaimer" about combining copics & printers with Matte Medium) :-)

The road (sentiment) is just some typing I did in a word document & printed onto gray cardstock.

The grass is just a thin strip of paper coloured with Copic markers (stippled for texture) and cut in a fringe.


MFT Die-namics clouds as foam background stamp Squigglefly Whimsy Town by mel stampz

The clouds are made with a My Favourite Things cloud die
(MFT Die-namics) in two ways:
  1. Do it Yourself cloud stamp
  2. Homemade vellum stickers
I cut the rounded MFT clouds in half for both applications & the birds are just
drawn on with a Copic Multiliner (fine permanent marker).


make a do it yourself fun foam background stamp:


  • MFT die-namics cloud die
  • White fun foam (or any colour you have)
  • White pigment ink/chalk ink
  • Cuttlebug C plate or large acrylic block
  • Optional: damp cloth (to moisten stamp)
  • Background/Texture Stamp to "kiss" on
Step 1) Cut clouds out of white fun foam

Step 2) Cut the foam clouds in half (for cumulus flat-bottomed clouds) or leave 'em fluffy

Step 3) Adhere them to an acrylic block (alternatively, your C plate for a Cuttlebug makes a perfect large clear stamping block)

Step 4) Stamp with your clouds. Pigment & chalk inks are lovely on fun foam & stamping-off or kissing (onto a background stamp) is a riot of fun!

Little Pointer: If you find it's hard to get a good solid image or keep the ink wet enough: before adding ink, try wiping over the foam with a damp lint free cloth (or a slightly wet brayer, or sponge...) to moisten it first, and then apply the ink.

To get homemade sheer stickers: cut clouds from self-adhesive vellum, cut them in half and stick them on. :o)

Thanks so much for visiting.
P.S. I'm still dreaming of that crafters' neighbourhood
(where You are all my neighbours!)


(a.k.a. stamp-geek, hehehe) ;-)

P.S. I hope you can all see these flickr images,
if not, please try clicking these blogger thumbnails:

Read More
Posted in | No comments

Friday, 17 September 2010

Cheap Nestabilities trick (and a quickie 5 minute card)

Posted on 18:00 by Unknown
Why do we make cards?

(Simply spreading the Love
?)

simple adayfordaisies etsy card (cut nesties label) by mel stampz

This card might be painfully simple, but I've been thinking a
great deal lately about making cards to give away
versus
making cards just for the sake of making cards.

Do you give all of your cards away?

How long does it take you to make a card?

You guys may know that I used to spend an insane amount of time making each card, but what you might not know is that I gave a limited amount away. I never seemed to have the right envelope & the cards were often too cute or too specific for general occasions. I think I was more focused on tutorials and design team work and not living in the moment, ya know?

Soooooh... all that blahblahblah to say that lately, I'm making cards
after choosing the envelope (How basic, I know, but
I am truly dyslexic, so that's my excuse for not
figuring out this basic element sooner. LOL)

I'm also trying to make much quicker cards that are more "generic" so that
C and me can give many more cards to the people we know & love.

In that spirit, here's a quick card, with a quick & cheap trick.


(cutting nesties shapes)


It doesn't get any simpler than this:

Trim your die cut to get new shapes

(This one is Spellbinders' nestabilities label 9)

DETAIL simple adayfordaisies etsy card (cut nesties label) by mel stampz

Here's another "brand new" label shape made
from
Nestabilities Label 5:


The neat part is that you can make different shapes with one die cut,
so it's stretching your dollar nicely.


With your imaginations, I'm sure you can think of a million ways
to cut nesties


The digital image is Bird Blossom Digital Stamp
I bought it from adayfordaisies (a day for daisies) on etsy.
Her artwork is stunning and so unique.

embossing DETAIL simple adayfordaisies etsy card (cut nesties label) by mel stampz - Copy

To heat emboss this digital image:
(and make the card)
  1. Prep speckled cream cardstock (brayer on a thin layer of Matte Medium)
  2. Print bird image on standard setting
  3. Sprinkle on clear embossing powder as soon as it's out of the printer
  4. Heat set the embossing powder to melt
  5. Colour with Copics: BG10, B00, YG03, YG23, YG00, Y02, YR16, R35
  6. Cut with nesties label (use scotch tape to keep die centered) & trim sides
  7. Stick the "thanks" sticker from SRM Stickers onto black cardstock
  8. Adhere it all onto a plain black card (easy peasy!)
I'm so excited that SRM Stickers has white & brown now!!!

Thanks so much for readin'
Hope you're doing wonderously great.

P.S. This is not a "paid" blog post. I scrounged around for the birdy art and bought it out of pocket. ;0) BUT I was lucky enough to receive some of my fave SRM Stickers as a surprise gifty in the "happy mail" :-)
Read More
Posted in A-Day-For-Daisies, cheap-tricks, Cuttlebug, Digital-Images, SRM-Stickers, techniques | No comments

Monday, 13 September 2010

4 3/8" square envelope templates (with liners) & pointers for acrobat downloading

Posted on 09:05 by Unknown
Happy Monday you wonderful blog buddies!

Thanks so much for your amazing response about the acrobat file-sharing.
You guys always blow me away with how sweet and thoughtful and helpful you are.
You Rock!!!

Methinks I have a plan...
In future, I'm going to add JPG images of the templates
(so you can view a preview of templates to see if you'd like them or not)
then I'll link those JPG images so you can quickly click the images to go download....


If you click a template image,
You should see a page like this:


Just click the green download button
in the upper left-hand corner to save that particular template:


(it should open a black box in the center
of the screen that says "Pick Location"
in green just click "Pick Location")

Then select the file you want to save it to
(or desktop) and click the save button...

...and hopefully that will do the trick for you...
(if not, just let me know) :o)

In future,
I will also provide the link(s) below the images, so that, I can offer you
a variety of file types: JPGs/PNGs/PDFs.

(Today's envelope templates are only in PDFs,
to ensure that they will stay the right size for a 4 1/4" card
[they measure exactly 4 3/8"])

If you'd like links to open in a new tab or window, simply:

A) Click on the image or link (left click on your mouse)
B) Then right click on your mouse (a menu should open up that includes the option to "open link in a new tab" (or window)
C) Select "open link in a new tab" and then you'll still have my blog page open, while you can open all the template links at once in new tabs, if you like.

I love this trick and end up with a gazillion tabs open--happy happy joy joy! ;O)

new envelope


Here are the 4 and 3/8" square envelope templates.
They are sized to fit 4 and 1/4" square cards.

Click the images to go download the PDFs:


square envelope with score lines:


PDF 4 and 3/8" square envelope (with score lines)

Pointers for use: Print template and score along dotted lines
Cut along solid lines, fold, and adhere.


square envelope with NO score lines:


PDF 4 and 3/8" square envelope (with NO score lines)


Pointers for use: Print template and score using the tick marks as a guide.
Cut along solid lines & fold.

For custom patterned envelopes:
1) print envelopes on the back of patterned paper
or
2) print a digital pattern on the other side of envelopes
or
3) fill envelope template in photoshop with patterns
(use edit>define pattern to make patterns)


liners for envelopes:


PDF LINERS for 4 and 3/8" square envelope


Pointers for liner use:
Print template and score along dotted line.
Adhere liners into top of envelopes before assembling them.

For custom patterned liners:


1) print liners on the back of patterned paper
or
2) print a digital pattern on the other side of the liners
or
3) fill liner templates in photoshop with patterns
(use edit>define pattern to make patterns)


Not feeling square?

If you'd rather make a standard A2 card & want an envelope template,


please click the photos above to go to
the envelope templates that are all linked in this post.

(there are two different styles)


Thanks again for being You!
Hope you can use these envelope templates...
:o)
Mel

P.S. sorry in advance for any typos. Migraine beastie is particularly persnickety this week (that evil nasty horrid creature!) ;o)

P.P.S. If you prefer PaperCraftPlanet downloads, the square 4 1/4 envelopes are available here
and
If you prefer SplitCoastStampers downloads,
they are also available here.
Read More
Posted in templates | No comments

Saturday, 11 September 2010

New curvaceous purse basket templates -- free

Posted on 14:45 by Unknown
Plain (un-patterned) version:


You can download the JPGS or find links
to PDFs in the Flickr set here

You can download the basic pieces here
(as PDFs) on SplitCoastStampers

or here on Paper Craft Planet

Damask patterned version:


You can download the damask patterned version here

below is the older chit chat post with acrobat testing
(and a sample of the finished basket)


...a wee peek at the new template (I'm such a tease, hey?)

BUT it is completely finished and all set to go--I just need to test
a new file-sharing method, since 4shared is so-so at best)


(file-sharing PDFs for bloggers)

Trying to find a new
file-sharing method:


I'm experimenting with adobe acrobat online file storage to find a way of
sharing templates that's easier/quicker for you (than 4shared. )

If you'd be so kind to try downloading this 1 template (linked below)
so that I can know if acrobat works well (or not) before I upload & share
all of the many parts of this new curvy basket template...

I'd be so grateful to hear whatever you think of the new acrobat method of
template- downloading, so I can trouble shoot & perfect it.


There seem to be two ways to share files with acrobat:
1)
linking
2) embedding
[not sure which you'd like better??? Both maybe?]


(TEST)

Here's the link method:
Click to download Curvaceous purse basket BOX (no score lines)

Here's the embed method:
(I think this might simply show a preview and
link to download on Acrobat?)


I tried downloading it myself (using the link) and it seemed very speedy.
but I just hope it as well works for you and
Thank You ever so much, in advance, for helping me get this right!


I can't wait to share all the template bits with you!

:o)
Mel
Read More
Posted in Blogging-tips, templates | No comments

Tuesday, 7 September 2010

Mouse has a cheezeburger (or does she?) ... non-crafting crazy cat post

Posted on 19:15 by Unknown
Well, I'm still working on that set of templates ("the ol' gray mare she ain't what she used to be") ;o) but hopefully Miss Mouse (the cat) can put a little smile on your face while I am being slow.


I think there is somethink up there that i wants.


Ohhhh Yes, I am certain there is somethink
up there waiting just for me!


What do you think it could possibly be???


Smells like something tastey!


A rodent? a birdy? a cheezeburger, perhaps?


Perhaps a cheezeburger?


Is it? Is it?? Is it???...


...Is it a cheezeburger for me???


WHAAAAT!!! nothing! zilch! zero! zip! nada!


Hey You. What gives?


It was You! You took the tremendously exciting somethink that
was up there waiting just for me, didn't you?


Admit it. You know you took it!


Tell me the truth now, my friend. We have wayz of making you talk!


Oh I am so sad and lost without it. (Forlorn, even.)
If I be cute CUTE will you give it back?


Hmmph! That does it! I shall not speak to you, or even look
at you for a hundred-million years!

teeheehee (Yup, not having enough crafting time seems to turn me into the crazy cat lady! Or it could be a "migraine madness" symptom?)


Happy almost Wednesday &
happy back to school to kids & parents alike.
;o)
hugs,
mel
Read More
Posted in 'Mouse'-the-cat | No comments
Newer Posts Older Posts Home
Subscribe to: Posts (Atom)

Popular Posts

  • free Butterfly Silhouette .studio cut files (in 3 styles)
    Hi, All! Here are those butterfly Silhouette .studio cut files. They are for only for the Silhouette machine... But I do hope to share other...
  • DIY digital paper (some freebies)
    The lull in posts (over the last couple of days) was for me to finish up this looooong post I've been wanting to share with you for eons...
  • New Popcorn Box template set (pretty stamp room storage) :o)
    Are you in the mood for a template or two? I was going to wait until I had really good photos and a full pictorial, but then I would take fo...
  • Missing with a migraine, Craft room BEFORE pics, & LINKs for Organizing the craft room
    Edited to add: Sorry guys. I feel like I was hit by a truck. Migraine's lasted so long... but I will be back with a post by tomorrow eve...
  • Graphics Fairy Inspiration (+vintage printables)
    Thank You all so much for your wonderful comments about the papers I've been obsessed with. Your kind words make me grin so big that I g...
  • "Honey, I shrunk the stationery!" (Hero Arts typewriter notebook)
    Still trying to make more of my cards into little gifts. This Hero Arts typewriter card is another take on the card turned refillable notebo...
  • 3 Clean And Simple cards (with SRM stickers)
    You guys may know that I was tragically born without the gene that let's you achieve a C lean A nd S imple card. ;-) Not sure why I find...
  • Making Your Own Colour Shimmer Sprays--Links & Info
    Info & Links Links for how to Mak e yo ur o w n Sh im mery s prays: (These are for you sweet Beth! oxo) ( more info on these colours in...
  • over 100 free pattern overlays ... at a glance
    Would you believe that the free overlay total is at 139 overlays and counting? (I might have a wee little addiction) ;-) Since overlays can ...
  • Felt-based cards (Rock-a-Bye Baby tutorial)
    New idea, Old projects.... I've been debating whether or not to post some older projects/tutorials since the big bad insecurity beast...

Categories

  • 'Mouse'-the-cat (10)
  • *TEMPLATEs (98)
  • 3D-projects (144)
  • A-Day-For-Daisies (7)
  • Amber Ink (9)
  • Angel's-Landing (2)
  • BASICS (47)
  • Blogging-tips (7)
  • Caardvarks (48)
  • Cat's-Pajamas (2)
  • cheap-tricks (224)
  • Christmas (33)
  • Claire-Keay (2)
  • Cricut (3)
  • cut-file (2)
  • Cuttlebug (45)
  • decor (6)
  • Digital-Images (131)
  • Distress-Inks-etc (14)
  • DIYstamps (1)
  • Eat-Cake-Graphics (11)
  • Faves (207)
  • Fred-She-Said (5)
  • Freebies (77)
  • GESSO (9)
  • Halloween (10)
  • Heather Ellis (3)
  • Hero-Arts (14)
  • ISC (7)
  • Jessica-Sprague (2)
  • Just-Rite (2)
  • LPS (63)
  • Mo's-Digital-Pencil (16)
  • My-Favorite-Things (33)
  • organizing (7)
  • Other-People's-Tutorials (36)
  • Paper-Garden-Projects (54)
  • Paper-Temptress (39)
  • Punches (21)
  • Purple-Onion-Designs (23)
  • S.U. (1)
  • SCOR-PAL (4)
  • silhouette (4)
  • Skipping-Stones-Design (7)
  • Squigglefly (6)
  • SRM-Stickers (8)
  • techniques (191)
  • templates (26)
  • Tiffany-Doodles (4)
  • Tutorials (252)

Blog Archive

  • ►  2013 (16)
    • ►  July (4)
    • ►  June (4)
    • ►  May (3)
    • ►  April (1)
    • ►  March (1)
    • ►  February (3)
  • ►  2012 (53)
    • ►  December (2)
    • ►  November (2)
    • ►  October (1)
    • ►  August (3)
    • ►  July (2)
    • ►  June (5)
    • ►  May (7)
    • ►  April (8)
    • ►  March (9)
    • ►  February (13)
    • ►  January (1)
  • ►  2011 (74)
    • ►  December (1)
    • ►  November (5)
    • ►  October (10)
    • ►  September (9)
    • ►  August (12)
    • ►  July (5)
    • ►  June (9)
    • ►  May (2)
    • ►  April (6)
    • ►  March (7)
    • ►  February (4)
    • ►  January (4)
  • ▼  2010 (84)
    • ►  December (7)
    • ►  October (1)
    • ▼  September (6)
      • Welcome to the Neighbourhood! (Stamping with Die-n...
      • Cheap Nestabilities trick (and a quickie 5 minute ...
      • 4 3/8" square envelope templates (with liners) & p...
      • New curvaceous purse basket templates -- free
      • Mouse has a cheezeburger (or does she?) ... non-cr...
      • "O" You are too wonderful!!! (+ a template peek an...
    • ►  August (1)
    • ►  June (1)
    • ►  May (7)
    • ►  April (21)
    • ►  March (3)
    • ►  February (17)
    • ►  January (20)
  • ►  2009 (234)
    • ►  December (16)
    • ►  November (21)
    • ►  October (11)
    • ►  September (23)
    • ►  August (29)
    • ►  July (26)
    • ►  June (10)
    • ►  May (16)
    • ►  April (26)
    • ►  March (22)
    • ►  February (27)
    • ►  January (7)
  • ►  2008 (39)
    • ►  December (14)
    • ►  November (25)
Powered by Blogger.

About Me

Unknown
View my complete profile