StampznewBright

  • Subscribe to our RSS feed.
  • Twitter
  • StumbleUpon
  • Reddit
  • Facebook
  • Digg

Wednesday, 20 May 2009

Armoire-shaped Box tutorial--Caardvarks Challenge

Posted on 01:25 by Unknown


This started out as a shaped card for the latest Caardvarks challenge, but I guess the carpenter in me wanted to express herself, so it turned into a piece of furniture. It's a fairly large gift box now, measuring...
  • 8 1/2 inches tall
  • 5 and 1/2 inches wide
  • 2 and 1/2 inches deep
There's a long tutorial down there on how it was made (in case you get the urge to build your own paper furniture!):O) Given the size, it might make a neat gift box for barbie or other dolls (with doll clothes hung on the front, heehee.) If you were feeling really ambitious, you could make it functional so the drawer opened. ;o)


1-Caardvark's challenge
2-create the armoire front & back pieces (shape & embellishment)
3-construct the box portion

-1-

Caardvarks' Shaped cards!

sponsored by...


Create a ***NEW*** shaped card! Anything but squares and rectangles goes! The winning card creator will receive a 3 month subscription to Scrapbook News and Review!

You can read all the details to play along here:

(and see the AWEsome shaped cards

created by the Caardvark Crew!!!) :O)


-2-

...create the armoire front & back pieces
(shape & embellishment)


  • A lot of cardstock--(uses 2 full standard sheets-8.5" x 11" each--Sahara Sand SU)
  • Thick acetate (the stuff here was cut from packaging)
  • Ruler (I love Tim Holtz Design ruler)
  • Hobby blade/exacto blade
  • Sanding block
Adhesives:
  • Oh so sticky tape (or other very good adhesive)
  • Tombow monomulti
  • and/or Crystal Lacquer (for wee areas)
  • Foam tape
  • Decorative brads and hinges (these were from the dollar store)
  • Wire hangers (ebay purchase ages ago)
  • Buttons (large one with black brad in center)


Step 1) Shape 2 armoire 'cards'

A) score & fold standard cardstock in half
B) score top & 2 sides at 2-8s inch in
C) trace & cut shape from bottom curve legs & top


Curved feet

can be found in this post...


Step 2) Set one of the armoire shaped 'cards' aside for the back.

Create the armoire for the front:

A) mark center line
B) cut out 2 doors.
C) Trim doors to leave about 1/4 of an inch (see scallop edge in step 8--I trimmed mine after the photo, sorry) ;O)


Step 3) Adhere thin frame to back of 'card' (leaving the doors free to open)


Step 4) Cut 4 panel frames (to make 2 doors)

These measure 2 inches wide by 7 and 3/8 inches high (but yours might vary depending on your scoring & cutting of the main armoire shape)


Step 5)
Cut windows (acetate panels) & sand to distress them, if you like.

Cutting: my windows were just under 2 inches wide by 7 and 3/8 inches high
Sanding: I like to sand acetate since i know it's bound to get scratched up with handling, so this makes the windows look like the wear & tear belongs. (That's the theory, anywho.) ;o)

(free acetate) This is the packaging of grundgeboard cut up.


Step 6) Mark on fine wood grain lines (scrape the paper with an exacto knife, paper piercer or needle.)

Click the photo if you'd like to see the wood grain up close:


You could also cuttlebug emboss it, of course.

To assemble the doors...


Step 7) Adhere the back panel to the acetate (really good double-sided tape does the trick)


Step 8) Adhere the panel acetate side up (to the back or inside of the flap on the armoire shape)


Step 9) Add handle-put brad in the front panel


The brad ends will be hidden. :O)


Step 10) Adhere front panels (I got buckling where the big decorative brads were so I added a bit of Crystal Lacquer in with a pin & held it until it dried nice & flat.)
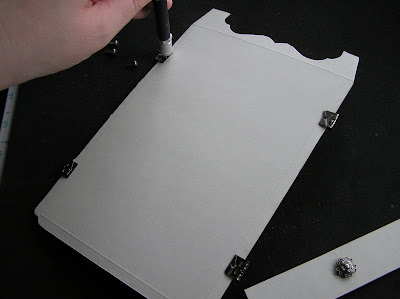


Step 11) Add hinges
(these are dollar store hinges that attach with brads --i got them at the DollarRama store in Ontario)


Step 12) Adhere decorative panel inside


Step 13)
Add Drawer:


A) Cut drawer (this one measures 1 inch high by 4 and 3/4 inches wide)
B) Score to make wood grain
C) Add handle (decorative brad)
D) Adhere drawer with foam tape

-3-

...construct the armoire box


  • 2 full standard sheets-8.5" x 11" (in addition to the 2 used to make the front & back)
  • The solid armoire card (set aside in the tutorial up there)
  • Oh so sticky tape
  • Scor-Pal
  • Scissors
This box has two identical pieces to form the front & back of the box (which might sound complicated but is actually really easy peasy.) :O)


Step 1) Scoring with the paper on the horizontal (short): Score standard size cardstock at 2.5, 7.5 & 10 inches.


Step 2) Scoring with the paper on the vertical (tall): Turn on the vertical & score at 2.5 inches.

Repeat Steps 1 & 2 to score a second sheet the exact same way
(for the back piece)


Step 3) Cutting of both sheets: Make 2 slit cuts at bottom & cut skinny piece off the side


Step 4) Assemble one half of the box


Step 5) Adhere the other half over top of the first


Step 6) Stick the uncut armoire card together (to make the back piece)


Step 7) Enforce all of the legs with scraps of cardstock cut to fit & doubled over


Step 8) Adhere completed box to the backs of the armoire 'cards'

and that's it...


Gotta love those Anyas ...

Click to check 'em out at

Paper Garden Projects

Info on how the image was coloured
(Copics on Gesso) is here:


Gesso lets you erase Copics!

The dress shaped template was printed on
gesso cardstock & embossed...

it can be found here


Hope there was somethin' fun here for ya!
:O)


Subscribe to Mel Stampz
Email ThisBlogThis!Share to XShare to FacebookShare to Pinterest
Posted in *TEMPLATEs, 3D-projects, Caardvarks, Faves, Paper-Garden-Projects, Tutorials | No comments
Newer Post Older Post Home

0 comments:

Post a Comment

Subscribe to: Post Comments (Atom)

Popular Posts

  • free Butterfly Silhouette .studio cut files (in 3 styles)
    Hi, All! Here are those butterfly Silhouette .studio cut files. They are for only for the Silhouette machine... But I do hope to share other...
  • DIY digital paper (some freebies)
    The lull in posts (over the last couple of days) was for me to finish up this looooong post I've been wanting to share with you for eons...
  • New Popcorn Box template set (pretty stamp room storage) :o)
    Are you in the mood for a template or two? I was going to wait until I had really good photos and a full pictorial, but then I would take fo...
  • Missing with a migraine, Craft room BEFORE pics, & LINKs for Organizing the craft room
    Edited to add: Sorry guys. I feel like I was hit by a truck. Migraine's lasted so long... but I will be back with a post by tomorrow eve...
  • Graphics Fairy Inspiration (+vintage printables)
    Thank You all so much for your wonderful comments about the papers I've been obsessed with. Your kind words make me grin so big that I g...
  • "Honey, I shrunk the stationery!" (Hero Arts typewriter notebook)
    Still trying to make more of my cards into little gifts. This Hero Arts typewriter card is another take on the card turned refillable notebo...
  • 3 Clean And Simple cards (with SRM stickers)
    You guys may know that I was tragically born without the gene that let's you achieve a C lean A nd S imple card. ;-) Not sure why I find...
  • Making Your Own Colour Shimmer Sprays--Links & Info
    Info & Links Links for how to Mak e yo ur o w n Sh im mery s prays: (These are for you sweet Beth! oxo) ( more info on these colours in...
  • over 100 free pattern overlays ... at a glance
    Would you believe that the free overlay total is at 139 overlays and counting? (I might have a wee little addiction) ;-) Since overlays can ...
  • Felt-based cards (Rock-a-Bye Baby tutorial)
    New idea, Old projects.... I've been debating whether or not to post some older projects/tutorials since the big bad insecurity beast...

Categories

  • 'Mouse'-the-cat (10)
  • *TEMPLATEs (98)
  • 3D-projects (144)
  • A-Day-For-Daisies (7)
  • Amber Ink (9)
  • Angel's-Landing (2)
  • BASICS (47)
  • Blogging-tips (7)
  • Caardvarks (48)
  • Cat's-Pajamas (2)
  • cheap-tricks (224)
  • Christmas (33)
  • Claire-Keay (2)
  • Cricut (3)
  • cut-file (2)
  • Cuttlebug (45)
  • decor (6)
  • Digital-Images (131)
  • Distress-Inks-etc (14)
  • DIYstamps (1)
  • Eat-Cake-Graphics (11)
  • Faves (207)
  • Fred-She-Said (5)
  • Freebies (77)
  • GESSO (9)
  • Halloween (10)
  • Heather Ellis (3)
  • Hero-Arts (14)
  • ISC (7)
  • Jessica-Sprague (2)
  • Just-Rite (2)
  • LPS (63)
  • Mo's-Digital-Pencil (16)
  • My-Favorite-Things (33)
  • organizing (7)
  • Other-People's-Tutorials (36)
  • Paper-Garden-Projects (54)
  • Paper-Temptress (39)
  • Punches (21)
  • Purple-Onion-Designs (23)
  • S.U. (1)
  • SCOR-PAL (4)
  • silhouette (4)
  • Skipping-Stones-Design (7)
  • Squigglefly (6)
  • SRM-Stickers (8)
  • techniques (191)
  • templates (26)
  • Tiffany-Doodles (4)
  • Tutorials (252)

Blog Archive

  • ►  2013 (16)
    • ►  July (4)
    • ►  June (4)
    • ►  May (3)
    • ►  April (1)
    • ►  March (1)
    • ►  February (3)
  • ►  2012 (53)
    • ►  December (2)
    • ►  November (2)
    • ►  October (1)
    • ►  August (3)
    • ►  July (2)
    • ►  June (5)
    • ►  May (7)
    • ►  April (8)
    • ►  March (9)
    • ►  February (13)
    • ►  January (1)
  • ►  2011 (74)
    • ►  December (1)
    • ►  November (5)
    • ►  October (10)
    • ►  September (9)
    • ►  August (12)
    • ►  July (5)
    • ►  June (9)
    • ►  May (2)
    • ►  April (6)
    • ►  March (7)
    • ►  February (4)
    • ►  January (4)
  • ►  2010 (84)
    • ►  December (7)
    • ►  October (1)
    • ►  September (6)
    • ►  August (1)
    • ►  June (1)
    • ►  May (7)
    • ►  April (21)
    • ►  March (3)
    • ►  February (17)
    • ►  January (20)
  • ▼  2009 (234)
    • ►  December (16)
    • ►  November (21)
    • ►  October (11)
    • ►  September (23)
    • ►  August (29)
    • ►  July (26)
    • ►  June (10)
    • ▼  May (16)
      • Little Paper Shop Release Day: {Sweet} & {Flower F...
      • LPS preview of {Flower Frenzy} & FABRIC (embossed,...
      • {Sweet} Surprise Box (LPS sneaky preview) & template
      • Impressabilities Resist technique & Inspirational ...
      • Free Digital Images & Elements INDEX & LINKS (+Cop...
      • Armoire-shaped Box tutorial--Caardvarks Challenge
      • LPS Robot Box: layering digital stamps on Gesso (+...
      • Paper Temptress vellum digi flower project
      • Vellum Collage
      • Flowers for Mother's Day! (digital image & paper f...
      • Microglaze Copic Colouring (and/or other markers too)
      • Copics on Gesso (lets you erase!!!)
      • Crafter's Travel Lap-desk (Caardvark Verse/Quote C...
      • Happy Birthday Julia (& a wire bouquet)
      • Action Ian (magnetic skater ian card)
      • TREE templates... (+ Caardvarks amazing Reader's w...
    • ►  April (26)
    • ►  March (22)
    • ►  February (27)
    • ►  January (7)
  • ►  2008 (39)
    • ►  December (14)
    • ►  November (25)
Powered by Blogger.

About Me

Unknown
View my complete profile