This post is dedicated to those of you who are old enough wise enough to remember the song "Puppy Love"! <--Click there to hear good ol' Paul Anka. :O)
I'm SO late with this sorry (Still having a hard time shaking this respiratory junkola, ugh!) ...But to celebrate the new Little Paper Shop stamp set, called {Puppy Love} I made a word document with the lyrics. (YOU CAN DOWNLOAD THE TEXT HERE.) It was printed on vellum, and embossed, and tinted to get a coordinating paper for the scallop mat.
The Embossed & Tinted Vellum:


Step 1) Prepare supplies before printing (Clear embossing powder & anti-static bag & vellum)
Step 2) Stick vellum in printer & print text out
Step 3) Sprinkle with embossing powder a.s.a.p & heat it gently
Step 4) Let cool & use as is or wipe with ink
Step 5) Remove excess ink
Tip: You can cut your sheet up before tinting (if you know what size you'd like) or just tint half to get 2 or more colours that coordinate. :O)
I am crazy in love with this lil' Bee (so is this Puppy if his blushing is any indication) ;O)
ETA: Some details I left out: The black on top of the embossing was done with a sharpie (for the bee's eyes & the pup's eyes and nose.) To get the puppy to have a healthy wet nose, lol, I just added Crystal Lacquer over it. His colour has lacquer & glitter and a brad. :O) The rest of the image is coloured using a red marker & a Niji watercolour brush (puppy), & the shimmer is from Pearlescent paints (sky & grass). The yellow dots are embroidery thread knots.
To make the Bee 3D I just...
1) Stamped the sweet Bee on watercolour paper in Silver Encore ink
2) Embossed him with Ranger Silver e.p.
3) Coloured him with a yellow Copic & a Black permanent marker
4) Added Crystal Lacquer to his wings & Dazzling Diamonds glitter
5) Stamped his antennae onto the main image
6) Stuck him on Foam Tape for dimension
The Ribbon Tag:
Step 1) Stamp the {Puppy Love} sentiment in black craft ink on the ribbon
Step 2) Sprinkle it with embossing powder & remove excess powder (i used a paper piercer for that)
Step 3) Heat the ribbon gently to melt the powder (seals ink in, but isn't shiny)
Step 4) Fray sides (pull out threads & seal the white stitching on the back with Crystal Lacquer)
Step 5) Cut end in points & melt slightly with a lighter to prevent fraying end
Step 6) Adhere & stitch on
The Stitchin':
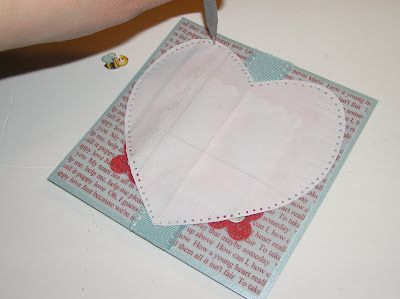
Here's one way to get a custom stitching shape (or faux-stitching too):
After you have your card elements placed how you'd like them...

Step 1) Cut the shape you want from scrap paper
(I folded & cut the heart just like in grade school-yup I was a paste eater, heehee.)

Step 2) Temporarily adhere your paper shape & pierce the outline
(I used regular double-sided tape since I was working on vellum, you can make tape repositionable by removing most of it's tack [sticking it on your pants a few times works nicely])

Step 3) Stitch your pierced outline
The Cardstocks:
The metallic cardstock I used to mat the image is a lovely shimmery blue from Paper Temptress called Plasma Blue & I added Lemon Drop Pop Tones cardstock for a hit of hot colour in the tiny mat behind it, with some Ridinghood Red from Stampin' Up!
And that's all she wrote... Hope you're all doing very very very well,


0 comments:
Post a Comment