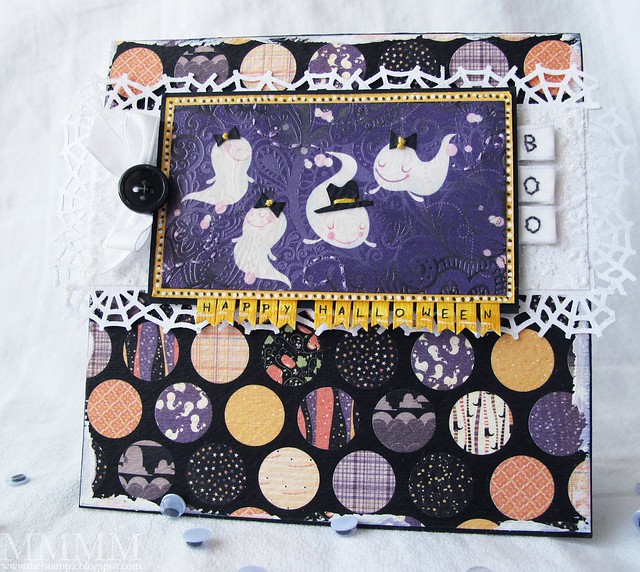
Slow poke, moi....
Today's card was another one I made for the Hero Arts window card
challenge ages ago, but never got to enter, 'cause I craft in slow motion.
Should I dress up as a turtle for Halloween, do ya think? ;o)
Today's card was another one I made for the Hero Arts window card
challenge ages ago, but never got to enter, 'cause I craft in slow motion.
Should I dress up as a turtle for Halloween, do ya think? ;o)
It was such a hoot to make!

The digital element of today's tutorial focuses on taking the
"find edges" technique
(that turns a solid image into an outline image)...
(in this older post):
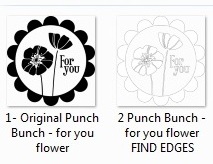
...just a little bit further:
Creating a quick shadow behind
a thin outline image.
Why?
Because sometimes the "find edges" filter in Photoshop
leaves you with an outline that is too thin & the image sort of
seems to disappear. This is one way to remedy that.
(that turns a solid image into an outline image)...
(in this older post):
...just a little bit further:
Creating a quick shadow behind
a thin outline image.
Why?
Because sometimes the "find edges" filter in Photoshop
leaves you with an outline that is too thin & the image sort of
seems to disappear. This is one way to remedy that.
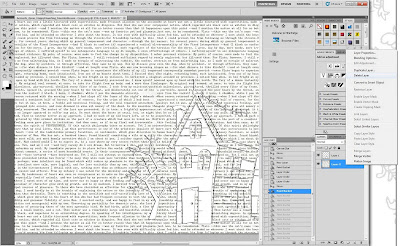
My particular project today starts out with this Hero Arts digital set,
but the technique should work with most solid images.
but the technique should work with most solid images.
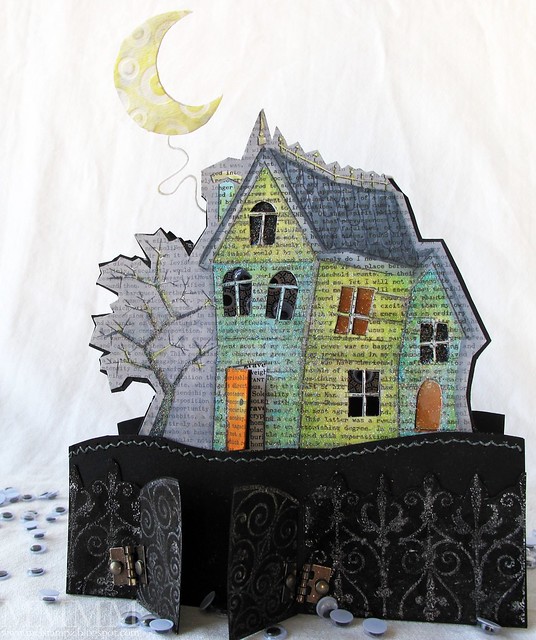
Hero Arts Happy Haunting:

(I turned the solid house image that comes with the set
into an outline stamp for colouring.)

...turn a solid image into an
outline image with a shadow:
This involves:
1) Making a copy of your image,
2) Turning it into an outline image and
3) Then pasting it over the original solid image
(which will show through as a shadow)
It's surprisingly easy & quick to do.
But please note:
Your images need to have a transparent background & solid white fill for
this to work. If they don't have transparency, you should be able to
use the magic eraser tool to erase the background on most images.
here's how...


Step 3) To make a shadow, paste this outline over the original. Use rectangular marquee tool & control C to copy


Click this link to Download
the one page reference PDF
for this tutorial.


Here are some other things I did to make the card...

Step 1) Enlarge the canvas of the new shadow image & make new layer. Temporarily, fill it with text to serve as a guide. Read it to decide what text you want where & move the house accordingly. (Select Layer then new; name it if you like & hit okay.)

Step 4) To create grey colour: Switch to foreground fill & fill the background with Black at 50 percent opacity. (Bucket tool; foreground tab; solid black colour).


Step 12) Add a piece of stitched black cardstock and top it with a fence & a gate.
I made these with Hero Arts Flourish Grids clear stamp:
A) Stamp both stamps on a piece of watercolour paper with versamark ink (repeating the square stamp to get a long enough fence piece & cutting the circle stamp to get the gate shape).
B) Heat emboss it with white embossing powder.
C) Distress it with black ink.
D) Cut around the stamping to make the shapes.
E) Adhere the fence to the hill.
F) Attach the gate with mini hinges (I got these at the dollar store).


Here's the text paper I made
from Edgar Allen Poe's short story The Black Cat
in case you'd like to use it:
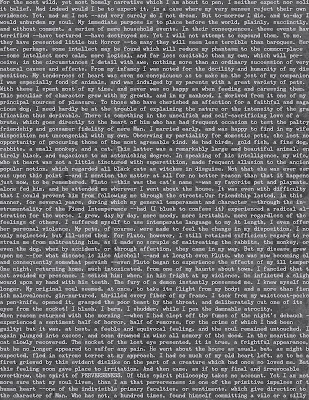

Here's a closer view:

and the links:
DARK GREY POE PAPER:
Poe's Black Cat text paper PNG
Poe's Black Cat text paper JPG
Poe's Black Cat text paper PDF
or large JPG (original size) GREY on flickr here
(right click & save image as JPG)
WHITE POE PAPER:
Poe's Black Cat text paper White PNG
Poe's Black Cat text paper White JPG
Poe's Black Cat text paper White PDF
or large JPG (original size) WHITE on flickr here
(right click & save image as JPG)
Happy Haunting!

P.S. Disclosure: I'm not affiliated with Hero Arts in any way.
This is just some stuff I bought... :o)
(I turned the solid house image that comes with the set
into an outline stamp for colouring.)

...turn a solid image into an
outline image with a shadow:
This involves:
1) Making a copy of your image,
2) Turning it into an outline image and
3) Then pasting it over the original solid image
(which will show through as a shadow)
It's surprisingly easy & quick to do.
But please note:
Your images need to have a transparent background & solid white fill for
this to work. If they don't have transparency, you should be able to
use the magic eraser tool to erase the background on most images.
here's how...
Step 1) Open your image file in Photoshop. Select filter then stylize and find edges.

Step 2) The find edges filter will create a thin outline (works with most solid images)
Step 3) To make a shadow, paste this outline over the original. Use rectangular marquee tool & control C to copy
Step 4) Go back to the original black version (the white outline one will be in your clipboard).
Step 5) Paste the outline white image over original black silhouette. Use move tool to reveal shadow to whichever side you like.

(Here's a one-page reference sheet)
Click this link to Download
the one page reference PDF
for this tutorial.


Here are some other things I did to make the card...
Fill with different levels of text in Photoshop
(to get the house white & the sky grey).
(to get the house white & the sky grey).
Step 1) Enlarge the canvas of the new shadow image & make new layer. Temporarily, fill it with text to serve as a guide. Read it to decide what text you want where & move the house accordingly. (Select Layer then new; name it if you like & hit okay.)

Step 2) Delete that temporary text layer (right click & select delete layer).

Step 3) Click the bucket tool & then select the pattern tab & fill with custom text.
There's a tutorial on how to create custom patterns and use them to fill things here.

Step 3) Click the bucket tool & then select the pattern tab & fill with custom text.
There's a tutorial on how to create custom patterns and use them to fill things here.
Step 4) To create grey colour: Switch to foreground fill & fill the background with Black at 50 percent opacity. (Bucket tool; foreground tab; solid black colour).
Step 5) Switch back to pattern & fill the background with text at 27 percent opacity.

Step 6) Print image & cut out the house roughly. Temporarily stick it to a 5 1-2 inch SQ black top-fold card & cut around it.

Step 7) Cut out the windows with a hobby blade or Exacto knife.

Step 8) Colour & glitter the house. I used Copic markers & S.U. Dazzling Diamonds glitter on Heat'n'stick powder.
...and added some vellum:

(The vellum was coloured orange with Copic markers & glittered).

Step 9) Cut out two crescent moon shapes by sticking 140lb watercolour paper back to back. If you like, you can draw a little template to follow.

Step 10) Pressure emboss the 2 moons for texture (this is Provo Craft's Spots & Dots folder).

Step 11) Add the moon to the card:
A) Distress the Moon (I used Copic markers and blender).
B) Adhere the two pieces together, sandwiching apiece of cloth floral wire between them.
C) Attach the wire by wrapping it around the top of the card fold & gluing it in place, if need be.
Step 6) Print image & cut out the house roughly. Temporarily stick it to a 5 1-2 inch SQ black top-fold card & cut around it.
Step 7) Cut out the windows with a hobby blade or Exacto knife.
Step 8) Colour & glitter the house. I used Copic markers & S.U. Dazzling Diamonds glitter on Heat'n'stick powder.
...and added some vellum:
(The vellum was coloured orange with Copic markers & glittered).
Step 9) Cut out two crescent moon shapes by sticking 140lb watercolour paper back to back. If you like, you can draw a little template to follow.
Step 10) Pressure emboss the 2 moons for texture (this is Provo Craft's Spots & Dots folder).
Step 11) Add the moon to the card:
A) Distress the Moon (I used Copic markers and blender).
B) Adhere the two pieces together, sandwiching apiece of cloth floral wire between them.
C) Attach the wire by wrapping it around the top of the card fold & gluing it in place, if need be.
Step 12) Add a piece of stitched black cardstock and top it with a fence & a gate.
I made these with Hero Arts Flourish Grids clear stamp:
A) Stamp both stamps on a piece of watercolour paper with versamark ink (repeating the square stamp to get a long enough fence piece & cutting the circle stamp to get the gate shape).
B) Heat emboss it with white embossing powder.
C) Distress it with black ink.
D) Cut around the stamping to make the shapes.
E) Adhere the fence to the hill.
F) Attach the gate with mini hinges (I got these at the dollar store).
and there you have it:


Here's the text paper I made
from Edgar Allen Poe's short story The Black Cat
in case you'd like to use it:


Here's a closer view:
and the links:
DARK GREY POE PAPER:
Poe's Black Cat text paper PNG
Poe's Black Cat text paper JPG
Poe's Black Cat text paper PDF
or large JPG (original size) GREY on flickr here
(right click & save image as JPG)
WHITE POE PAPER:
Poe's Black Cat text paper White PNG
Poe's Black Cat text paper White JPG
Poe's Black Cat text paper White PDF
or large JPG (original size) WHITE on flickr here
(right click & save image as JPG)
(For help with how to use Adobe acrobat
to download these files,
please see the bottom of this older post.)
to download these files,
please see the bottom of this older post.)
Happy Haunting!
P.S. Disclosure: I'm not affiliated with Hero Arts in any way.
This is just some stuff I bought... :o)