


A wee cuttlebug idea for ya...Cuttlebug'ged felt and some other fun Cuttlebug stuff...

1...How to... Cuttlebug felt (or use another pressure embossing machine)
2...Inspiration...The Cuttlebug link list turns 200
3...New & Nifty...Some exciting news to share (Cuttlebug Challenge Blog design team!)
4...Party Time!...see creative peeks of unreleased folders
2...Inspiration...The Cuttlebug link list turns 200
3...New & Nifty...Some exciting news to share (Cuttlebug Challenge Blog design team!)
4...Party Time!...see creative peeks of unreleased folders
-1-

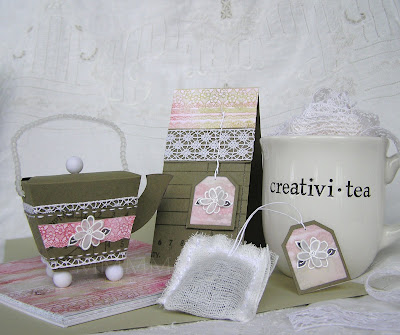
(Cuttlebug felt)

I love the look of felt, but sometimes it's hard to work with.
Sticking felt to cardstock is a fun way way to cheat:
Sticking felt to cardstock is a fun way way to cheat:
- I find the stiffer cardstock backed felt easier to sew & to adhere to projects.
- It also lets the felt hold embossing (& cuts better with dies)
- Not to mention it's a handy way to use cheap thin felts (without having them actually look cheap & thin LOL.)
Just stick the felt onto matching cardstock & emboss:
1. Stick felt onto cardstock [I used "Alene's Tack it Over & Over (fabric glue)]
2. Let it dry and Cut it however you like (To die cut with nice edges, try a piece of copy paper on top of the felt. The sandwich that makes with the cardstock cuts better. Thanks again for that tip Martha!)
3. Run it through an embossing folder (for the deepest embossing: mist both the cardstock & the felt side lightly and then emboss.)
4. Stitch it or embellish it however you like.

<--Here's one way to use
felt cardstock pieces
-2-

And the news that has me freakin' out!...2. Let it dry and Cut it however you like (To die cut with nice edges, try a piece of copy paper on top of the felt. The sandwich that makes with the cardstock cuts better. Thanks again for that tip Martha!)
3. Run it through an embossing folder (for the deepest embossing: mist both the cardstock & the felt side lightly and then emboss.)
4. Stitch it or embellish it however you like.

<--Here's one way to use
felt cardstock pieces
-2-


-3-

There's going to be more Cuttlebug stuff around here, since I was lucky enough to be asked to join in the Cuttlebug Challenge senior design team (insert squeal of joy here)!!! :O) I've been a fan for ages. Maggie always has the latest scoop and breaking news, and she& the talented design team make some truly astounding things. What an honour to get to join in the fun!
-4-

Sneak peeks and creative ideas with all the new (yet to be released) folders on the CuttleBug Challenge Blog. The fun has started already and it'll keep rolling for over a month! (Until August 1st) Want more details? Please visit the blog here. :O)

Don't wanna miss a thing?
Want to follow the Cuttlebug Challenge blog? Add a blinkie to your blog? Check out the upcoming challenges? Just look in the right-hand sidebar on the blog.
Wanna subscribe to the blog's email updates? check out their left-hand sidebar:
Wanna subscribe to the blog's email updates? check out their left-hand sidebar:

I can't wait to share some new Cuttlebug techniques with you! (Don't have a Cuttlebug? Don't worry, some of them have options for those who have no cuttlebug too.)
Thank you so much for taking time to visit!

P.S. Now that I won't be neglecting my Cuttlebug anymore, I just have to get that Cricut Expression up and running too, LOL. Got to get SCAL already!


