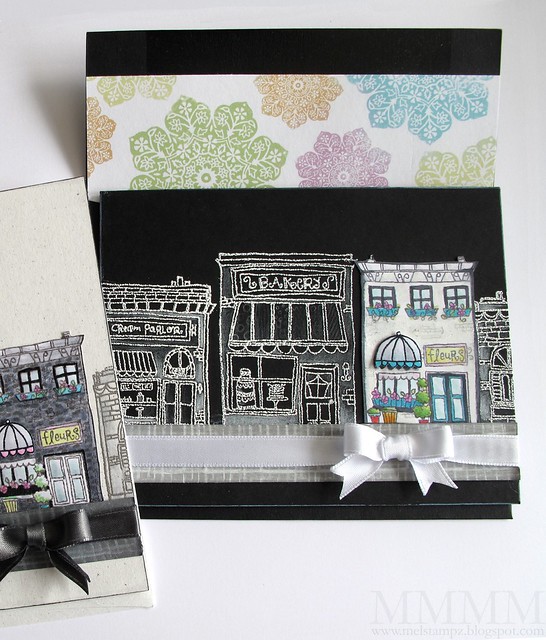
So I'm addicted to colouring these little Hometown buildings from Purple Onion Designs. The flower shop is my fave, because it's so easy to add dimension by stamping an cutting a second little awning (and popping it up on a bit of foam tape).
Ever try paint over colouring? I added some white acrylic paint to the flower shop above (with a little paint brush over the black heat-embossed image) to tone down the bricks. Something methinks I shall try again sometime.
It was also fun to colour bricks in with little dabs of grey Copic markers:
Do you decorate the insides of your cards?
I never used to decorate inside, but then people would open them with an expectant look on their faces and you could see a little "oh it's empty, huh..." look in their eyes. I wanted to give them something that wasn't anticlimactic, so these flowershop cards have bright flowery paper inside. (It feels especially fun inside the black card since it's a surprising pop of unexpected lightness.)
-1-
Step 1) Heat emboss 2 images of the flower shop using black Archival ink & clear embossing powder. Stamp 2 extra awnings & cut them out. Step 2) Colour the images. I used Copic markers for both (and added white paint to parts of the the white flower shop building).
Step 3) Cut some cards A2-size. One black & one speckled/Natural cardstock.
Step 4) Stamp & heat emboss other Purple Onion Design buildings on the card-fronts. White colorbox ink on the black card with clear embossing powder & silver pigment ink with silver e.p. on the speckled card.
Step 5) Colour these surrounding buildings with a little white pencil crayon for the black card & grey Copics for the white card.
Step 6) Add sidewalks & ribbon: Cut 2 strips of cardstock to make the side walks. (I used two shades of grey & added rough lines with white Prismacolour pencil. Add white & grey ribbon with bows. Adhere the strips to the cards.
Step 7) Adhere the Flower shops to the cards. Decorate the insides with paper & add the sentiment, heat embossed on grey paper to the inside of the cards.
The sentiment above "Have a Blooming good day!" is one
that comes with the rubber stamp set:
that comes with the rubber stamp set:
-2-

The stamps used here are several from The Hometown Collection drawn by
Stepanie Ackerman for Purple Onion Designs
For the main image,

-3-

free printable Batik flower paper
To save these files:
In Firefox/Chrome: right click on the image & choose "save link as"
In Explorer: right click on the image & choose "save target as"
Light Batik flower paper sized to line the
inside of an A2 card (5-1/2" x 4-1/4") PNG:

(or you can add it to your faves here on flickr)
Light Batik flower paper to fit an A2 envelope
(for lining it) PNG:

(or you can add it to your faves here on flickr)
There's a tutorial for lining
envelopes in a hurry here:

Light Batik Flower paper - standard size
8.5" x 11" 350dpi JPG:

(or you can add it to your faves here on flickr)
Light Batik Flower paper - 12.5" square 350dpi PNG:

(or you can add it to your faves here on flickr)
If you'd like the paper brighter,
here's a vivid 12.5" square version PNG:

(or you can add it to your faves here on flickr)
Using overlays to make faux misted papers:
You might recognize this Batik flower pattern from the 100+ overlay post.
I coloured it in Photoshop using spray paint style brushes
(and overlapped the hues here & there) to get a misted look.
Want to try this effect yourself? Here's a
video tutorial for how to use overlays as mist masks
by Jessica Sprague:
video tutorial for how to use overlays as mist masks
by Jessica Sprague:
Thanks for stopping in. Hope your day
is bright and beautiful!


