StampznewBright

  • Subscribe to our RSS feed.
  • Twitter
  • StumbleUpon
  • Reddit
  • Facebook
  • Digg

Tuesday, 30 March 2010

Book-page Mod Podge blossoms--(3D cherry blossoms à la Fred She Said)

Posted on 00:01 by Unknown


Do you buy your flowers or make them yourself?
I must admit, I can never bring myself to spend cash on pre-made flowers;
some of them are so very pretty (but they also seem ultra pricey!)

Caardvarks photo inspiration with book page Mod Podge blossoms mel stampz

Granted, making your own flowers can take a bit of time, but are you like me (a bit of a cheapie)? Do you get that little thrill when you think of all the money you save making your own embellishments? (And then grin to think that you can spend it on other crafty goodness?!?...and still enjoy how unique your flowers are, too?) ;o) Being "cheap" can be such a crafty-blast, hey? ;o) giggle giggle.


1...making Book Page Mod Podge flowers
2...cheap tricks: textured leaves from scraps
3...a couple of variations

-1-
...make Book Page Mod Podge flowers:


These are made with plain cardstock & pages from an old book,
but you could use all kinds of things, in place of book paper:
  • Patterned 12x12 papers
  • Wrapping paper
  • Fabrics
  • Phone book pages
  • Maps
  • Magazines
  • Sewing Patterns
  • Lined/Graph paper
  • Ledger paper
  • Stamped or inked colour cardstock
  • Wallpaper
  • Patterned tissue papers


  • A flower image (digital or stamp) in different sizes (I used Fred She Said's Digi flowers from the Smelling Cherry Blossoms set)
  • Computer & Printer; 80lb or 100lb cardstock (white)
  • Pages from a book (or your favourite paper or fabric etc...)
  • Mod Podge & a scrap of cardstock to spread it
  • White acrylic paint (and an optional stamp to texture it with)
  • Scissors, hole punches (for the divots at the petal tips)
  • To shape: stylus tool (or the rounded end of a paint brush/pen) & a soft surface (fun foam or mouse pad)
Optional:
  • For flower colouring: Copic refill & paint brush-Frost Blue B00 (or alcohol ink or diluted acrylic paints
  • For leaves: Scraps from the flowers & a paper piercing tool to texturize
  • Copic Marker or other medium to tint leaves YG23 New Leaf
  • Calendar stamp used as a Background stamp --from Purple Onion Designs
  • "Happy Birthday to You" sentiment is from S.R.M. stickers.
  • Moths are from the Hero Arts DigiKit - Mod Moths Mini Kit by Holly Brooke Jones


Step 1) Prepare a document in order to print lots of flowers out on one piece of cardstock (or stamp the flowers out if you like.) I like digital the best for this, because you can size them differently for various flowers, in exactly the sizes you like best.

I used Fred She Said's Digi flowers from the Smelling Cherry Blossoms set as a Photoshop brush--but if you are a beginner with that type of technology, you could use whatever method you're most comfortable with to paste a whole bunch of the three sizes that come in the set in one document.

Step 2) Print the flowers on thick 80lb or 100lb cardstock.

Step 3) Glue pages from an old book to the blank back of the paper that the flowers are printed on (I used Mod Podge matte to glue):

My method of choice for applying Mod Podge:


3A) I like to pour Mod Podge straight onto the cardstock and then very quickly...


3B) ...spread the Mod Podge in an even layer--not too thinly or too thickly. (Green tip: using a piece of heavy cardstock to spread it saves having to clean a brush or waste a disposable foam brush.) I love it when my sheer laziness & cheapness is good for the environment, hehehe.


Step 4) Press book pages (or whatever paper type you like) into the wet Mod Podge. Of course, different book pages give different results; old book pages that are falling apart will give you an old distressed wall paper look.


Step 5) Apply some white paint (or any colour you like.) I used white acrylic paint mixed with Mod Podge and applied it with a rag (still no dirty brush to clean.)


Step 6) You can add interesting texture by pressing a rubber stamp into the wet paint (it may pull up some of the paper, but I love that look.)


To avoid damaging your stamps when using them in paint: Prep the stamp with a generous coating of Versamark & just be sure to clean your stamp as soon as you're done with it.

To clean it very well: I find scrubbing the paint of gently with a toothbrush & warm water with a touch of dish soap works wonders. :o)


Step 7) Rough cut the flowers: After the page is dry, flip it over & roughly cut to trim around a section of flowers.


Step 8) Cut into separate flowers & punch. I like to cut them apart but leave some of the rough outline intact (in other words, don't trim it perfectly yet.) It gives you more paper to hold while you punch....


Step 9) Punch the little divots at the tip of each petal using different sized hole punches for the different sized flowers (so much easier than trying to cut those little divots by hand & it's faster!)

The Fred She Said flowers have a built in guide for where to punch the holes. No need to punch in the exact center, since it looks more natural if you're not exact.


Step 10) Cut the flowers out (the FSS flower centers end up on the back of the flower--they're so cute that it's a shame to hide them, but they make a fantastic guide for cutting--especially if you want to cut deeper petals than the original flower for shaping.)


Step 11) Shape the flowers. Use a stylus (or the rounded end of a paint brush or a pen) on top of something soft. I used a homemade fun foam mat (but you could use a soft mouse pad) to shape the flowers...

Here's the way I like to shape.
It's very fast & gives a distressed look...


11 A) Press down once in the middle from the front.


11 B) Next, flip the flower so the back is showing and press once in the middle of each petal.


11 C) To finish, flip it over again (so the front of the flower is showing) and press once again in the middle to reshape.

Many people work their shaped flowers much more nicely than this (by using various sizes of stylus in little circles) but I like the speedy (lazy) shabby-chic look for these. You might find that your shaping technique may need to be different with different paper types. :o)


Step 12) Pierce a hole in the center of the shaped flower (if you want to stitch them on, or if you just want to have a decorative hole in the flower center.)


Step 13) Add colour--paint on Copic marker refill with an old brush (if you don't want to clog Copic marker tips.) This Copic Colour is Frost Blue B00.

Copic markers: The chisel or broad end often serves as my "do-anything-messy-with-it" end of my Copic markers--since acrylic paint can damage Copic tips, but I refuse to be limited by that, LOL.) Alternatively, you could use alcohol inks or thinned-down acrylic paints...

and here are the finished flowers:
close flower
(stitched on with beads in the center.)

-2-

(as if this wasn't cheap enough, LOL)

Can't leave those scraps alone!


You can save the scraps that you cut away to make leaves:


Step 1) Just cut leaves out, free-hand (or if you'd rather have an outline you can draw or stamp a leaf shape).


Step 2) "Draw" lines on with the pointed end of a paper piercing tool (turned on it's side a little on a similar angle as you would hold a paint brush).


Step 3) Colour your leaves. (This photo is evidence of me being BAD & colouring with that broad chisel end of the Copic marker...gotta have some rebellion in your life, right? Stamp dork style.) ;o) This is YG23 New Leaf.


A little Sticky Point: The Copic ink may make the Mod Podge or paint on the leaves sticky, so you might want to let them dry (to cure the ink) before handling or you might get a fingerprint-y style. If you're impatient like me & you get them fingerprinted up, you can just reapply a bit of colour to fix it. ;o)

Finicky schtuff:
  • Drawing the leaf lines on first & then colouring with Copics seems to give more colour, as it builds up a little in the grooves.
  • Depending on your book paper & the saturation level of paint, you may get a more mottled look (the older paper I used tore a bit and the Copic colour was deeper).
  • Paint resists the colour, but any torn or scratched bits let the ink soak into the scored lines--making darker leaf veins.
  • To get a shiny finish on your leaves you can add an extra coat of Mod Podge on top (it makes them more durable too...)
-3-
Here are some vintage-y ones
(really distressed and un-coloured):

Caardvarks SRM Stickers & Hero Arts cages & my freebie  birds mel stampz - Copy

If you want a really distressed look, you can use older crumbly book pages
(that are really easily torn) and that should let you flake off a bit of the layers, like these:


or you could sand off a little of the paint.

...and here's a layered one:
...it has glitter & a couple of Copic colours (aqua & new leaf green)

You can see the whole card with the more vintage
looking flower here, if you like:
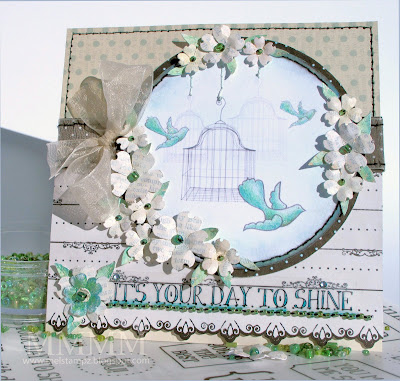

Thanks so much for checkin' this out!
Hope you have the most gorgeous day,


Edited to Add:
Thanks to the sweetness of Nance, here's the text PDF download
(You're amazing Nance! Thank You!!!)

Edited to Add:
Here's the PDF of this post, in case you'd like it:
Download Book-Page Mod Podge Blossoms PDF

(It's with photos; I still need to learn how to take them out for a text only version) :O)
(please click if you'd like to visit the blog
from an email or reader)
Read More
Posted in BASICS, cheap-tricks, Digital-Images, Faves, Fred-She-Said, techniques, Tutorials | No comments

Saturday, 27 March 2010

Felt-covered MFT 3x3 Easter Basket (a pictorial)

Posted on 00:00 by Unknown


First off, Thank You Thank You Thank You for your sweet well wishes.
You are simply THE best readers on the planet!
(and I'm so thankful that you're still out there after all that time...)

...and without further ado a big ol' extra long 3D tutorial...

...fuzzy wuzzy wuz a basket:

MFT felt easter basket mel stampz

This basket was too much fun to make fuzzy wuzzy with felt!

Let me tell you, I have been going stir crazy wanting to share some samples with you that I made using this MFT Basket Template (the very first "professional" template that I got to design for My Favorite Things) !GRIN! :-D

It has a coloured liner inside:

MFT felt easter basket LINER mel stampz
(made with the MFT Easter Daisies digital paper
collection
designed by Stephanie Fizer.)

...The basket template is sized to hold 3x3 cards (and envelopes):

MFT felt easter basket What's Crackin' 3x3 CARDS mel stampz
(Of course, you could fill it with Easter treats, instead
--or both treats & a card!) ;o)

The cutie pie Easter images are from MFT's
What's Crackin' set (perfect size for 3x3 cards)


1...Summary of the felt panel process (basically, just glue it to cardstock & cut)
2...How to make a felted MFT Easter basket: a) the main basket; b) the outside felt panels; c) the patterned liner; d) the 3x3 cards.
3...Cheap tricks (Hatching or Cross Hatching Scratching for texture)

-1-


A felt basket is as easy as ABC to make (as a no sew project, if you like)

A) Just print the template for the liner panels (that come with the MFT basket template) on one sheet of cardstock.

B) Glue some felt on the blank backside of the printed template cardstock.

C) Cut the felted panel pieces out, and use the rest of the templates to make a basket to stick them to.

(Being a sewing fiend, I added some stitched edging around the felt panels & sewed the buttons on, but you could glue some lacy trim on for added texture if you prefer not to sew.)


-2-

make a Felt-covered MFT Easter Basket:


Hope the tutorial gives you some ideas for how you can use the different
liners and/or panels that come with the MFT basket template...


  • MFT Easter Basket Template
This uses these three parts that all come with the MFT Easter Basket template:
  1. The main basket
  2. The liner (the version that's all in one piece )
  3. The liner/panel pieces & handle
In other words, it uses the main basket template & both of the two varieties of liners that come with it (one of the liner types to decorate the inside and another one as felted panels to embellish the outside.)

Other materials:
  • New MFT clear stamp set What's Crackin'
  • White 100lb cardstock
  • White felt (or your favorite colour), Fabric glue (or Mod Podge)
  • Glue Glider Pro Perma Tac, Tombow Monomulti
  • Perfect Paper Panels, Black Archival ink
  • Clear embossing powder, heat gun
  • Copic markers, Prisma Color Pencil crayons
  • Cutting & Scoring tools
  • Paper piercer, needle, thread,
  • Daisies Patterned Digital paper from My Favorite Things
the main basket:

Step 1) Create the basic basket:


1A) Print the basket template on white 100lb cardstock. (I usually prefer the version with no dotted lines, but since this basket is lined, you could use the version with the dotted lines--there are both options available when you buy the template.)


1B) Score the template & cut it out. Fold along the score lines.


1C) Assemble it--with the tabs on the inside of the box.

the outside (felt) panels:

Step 2) Print the liner template & add felt to it:


2A) Print the liner/panel template (the one with separate pieces) onto more 100lb cardstock


2B) Glue a piece of felt to the back of it (the plain side.) I used Mod Podge & dried it under a big book to flatten it.


Step 3) Cut the felted panel pieces out. Tip: Pierce the template before cutting the pieces out, through the felt, if you'd like to stitch it.


Step 4) Create an extra overlapping felt piece 2/3 the size of the front
(to make it look like those cute fabric wrapped Easter baskets.)

4A) Trace one of the long sides onto the left over felt scrap (leaving a long strip for the handle.) 4B) Draw a straight line down the template with a pencil--approximately 2/3 of the way along it
4C) Cut it out (along the shaped template edge & the straight line you've drawn.)


Step 5A) Embellish the panels:

5A) Stitch with embroidery thread along the sides of all the felt panels.
5B) Stitch little buttons down that straight cut edge of the smaller piece made in step 4.


5C) Glue the 2/3 piece with the buttons to the whole felt front piece.

Stitching Tip: to make it easier to stitch felt, hold the piece up & use a bright light to show you where the holes are from the felt side. Light colours of felt will show where you pierced. Here are the 4 finished sides:


Isn't felt so quintessentially spring? It just feels all sheep-y or fuzzy-bunny or baby-ducky like, doesn't it?


Step 6) Adhere the handle to the basket inside. (Pierce & add a brad, if you like.)


Step 7) Adhere the felt pieces to the outside of the basket--using a good strong adhesive.
the patterned liner:


The beauty of digital papers is that you can print them on one side of the paper & print your template on the other side for a speedy coloured liner. All the patterned digital papers here are from MFT's Daisies Digital paper, but this would also work with your favorite patterned papers, of course... :o)


Step 8) Print the MFT Daisy Easter digital paper onto white cardstock.

Step 9) Turn the MFT patterned digi paper into a basket liner:

9A) Flip the MFT digital paper over & print the liner template on the blank back side (In other words, print the liner version that's all in one piece on the blank side of the MFT digital patterned paper.)

9B) Score the liner & cut it out.


9C) Pierce with a paper piercer & hand stitch it--or sew by machine--if you like sewing.

Step 10) Add the liner to the inside of the basket (covering the handle ends.)


10A) Put the liner in the basket (with no adhesive on it, yet.) It needs a little tuck to get in between the handle & the lack of adhesive makes that easy. This dry fit method also means you can take it out & trim it if need be.


10B) Adhere the liner--I like to add a line of tombow Monomulti & hold for a few seconds while it dries--especially around the handles so the fit is nice & tight:


the 3x3 cards:


This photo makes these look a "hare" larger but they're just 3 inches by inches...
such an economical size of card to make as part of a gift set. (Cheep Cheap!)

the main 3x3 card (base):


Step 1) Create the main card & panel:

1A) Cut the pieces:
  • For the main 3x3 note card, cut a piece of white cardstock to measure 6 inches by 3 inches.
  • For the patterned panel: print a piece of MFT Daisies paper & cut a piece to measure 2 7/8" square
1B) Pierce & stitch around the outside edge of the daisies panel, if you like sewing (or faux sew it instead.)

1C) Adhere the daisies panel to the white folded 3x3 card.


Step 2) Make a matching decorative strip with a bow:

2A) Print & cut a strip of matching polka dot paper (also in the MFT Daisies kit). This one is cut to measure 2 and 7-8" wide x 1" high.

2B) Adhere bits of organza ribbon to the back of the panel of MFT digi paper strip.

2C) Stick the strip with the ribbon onto the front of the folded 3x3 card:


Step 3)
Tie the organza ribbon into a bow & stitch a wee button onto it (or glue one on.)


Step 4) Add the Easter animals from the MFT stamp set "What's Crackin?"

the What's Crackin? chick:

Step 1) Making a paper-pieced What's Crackin' chickie to match the liner:

1A) Stamp the Chick in the shell from the MFT clear stamp set "What's Crackin?" onto Perfect Paper Panels & heat emboss it in clear. Colour it in with Copic markers & Prisma Color Pencil crayons (or using your preferred colouring method.)

1B) Paper piece his little egg shell.


Little TIP:
Another one of the lovely things about digital papers is that you can print them in different coordinating sizes. I printed the MFT daisies digital paper at a smaller percentage for paper piecing with teeny smaller scale patterns (and then it matches the larger papers perfectly):


To print different sizes easily, you can use your printer settings (print at a percentage) or print in photo software that lets you print a number of photos on one page. It will give you different sizes and save ink too.

(I swear this pinky-purple is going to be the next hot colour.)
It's what all the hip "chicks" are wearing:


heeheehee ;o)

Paper piecing: I've embossed the stamped What's Crackin' image on the smaller scale MFT Daisies paper. Then, cut out the two halves of the shell & adhered them to the coloured chickie.

the What's Crackin? bunny:

-3-

(Scratching paper to make fur "hatching")

Scratching fur? huh!?
!


No I haven't gone wild (well maybe) but I find "Hatching" (or "Cross Hatching") to
be such a fun sculptural way to get a unique fur texture (and it's free.)


To get Hatching: Just scratch lines of fur onto your image using a paper piercing tool (or the tip of a needle (one that's not overly sharp so it doesn't scratch your image up.) You can colour before or after you texturize the fur, to achieve a more subtle or a more bold fur look. Of course, it works for grass or other textures too...

For Cross Hatching: (which gives a texture effect like basket weave or checker board) just go over your initial scratched texture (against the grain that you created with the first scratches) to get texture that looks more like scratch-y squares. :o)

Thank You so much for 'hopping' by!


(click to visit the blog from an email or reader)

P.S. Wanna make your own basket? :-)
Here's a quick link to the MFT Easter Basket Template
The templates get emailed to you, so it would be in time for Easter, if you like.

(I would just flip out to see what you make with it!)
If you have any questions at all, please don't hesitate to ask. :o)
Read More
Posted in 3D-projects, Faves, My-Favorite-Things | No comments
Newer Posts Older Posts Home
Subscribe to: Posts (Atom)

Popular Posts

  • free Butterfly Silhouette .studio cut files (in 3 styles)
    Hi, All! Here are those butterfly Silhouette .studio cut files. They are for only for the Silhouette machine... But I do hope to share other...
  • DIY digital paper (some freebies)
    The lull in posts (over the last couple of days) was for me to finish up this looooong post I've been wanting to share with you for eons...
  • New Popcorn Box template set (pretty stamp room storage) :o)
    Are you in the mood for a template or two? I was going to wait until I had really good photos and a full pictorial, but then I would take fo...
  • Missing with a migraine, Craft room BEFORE pics, & LINKs for Organizing the craft room
    Edited to add: Sorry guys. I feel like I was hit by a truck. Migraine's lasted so long... but I will be back with a post by tomorrow eve...
  • Graphics Fairy Inspiration (+vintage printables)
    Thank You all so much for your wonderful comments about the papers I've been obsessed with. Your kind words make me grin so big that I g...
  • "Honey, I shrunk the stationery!" (Hero Arts typewriter notebook)
    Still trying to make more of my cards into little gifts. This Hero Arts typewriter card is another take on the card turned refillable notebo...
  • 3 Clean And Simple cards (with SRM stickers)
    You guys may know that I was tragically born without the gene that let's you achieve a C lean A nd S imple card. ;-) Not sure why I find...
  • Making Your Own Colour Shimmer Sprays--Links & Info
    Info & Links Links for how to Mak e yo ur o w n Sh im mery s prays: (These are for you sweet Beth! oxo) ( more info on these colours in...
  • over 100 free pattern overlays ... at a glance
    Would you believe that the free overlay total is at 139 overlays and counting? (I might have a wee little addiction) ;-) Since overlays can ...
  • Felt-based cards (Rock-a-Bye Baby tutorial)
    New idea, Old projects.... I've been debating whether or not to post some older projects/tutorials since the big bad insecurity beast...

Categories

  • 'Mouse'-the-cat (10)
  • *TEMPLATEs (98)
  • 3D-projects (144)
  • A-Day-For-Daisies (7)
  • Amber Ink (9)
  • Angel's-Landing (2)
  • BASICS (47)
  • Blogging-tips (7)
  • Caardvarks (48)
  • Cat's-Pajamas (2)
  • cheap-tricks (224)
  • Christmas (33)
  • Claire-Keay (2)
  • Cricut (3)
  • cut-file (2)
  • Cuttlebug (45)
  • decor (6)
  • Digital-Images (131)
  • Distress-Inks-etc (14)
  • DIYstamps (1)
  • Eat-Cake-Graphics (11)
  • Faves (207)
  • Fred-She-Said (5)
  • Freebies (77)
  • GESSO (9)
  • Halloween (10)
  • Heather Ellis (3)
  • Hero-Arts (14)
  • ISC (7)
  • Jessica-Sprague (2)
  • Just-Rite (2)
  • LPS (63)
  • Mo's-Digital-Pencil (16)
  • My-Favorite-Things (33)
  • organizing (7)
  • Other-People's-Tutorials (36)
  • Paper-Garden-Projects (54)
  • Paper-Temptress (39)
  • Punches (21)
  • Purple-Onion-Designs (23)
  • S.U. (1)
  • SCOR-PAL (4)
  • silhouette (4)
  • Skipping-Stones-Design (7)
  • Squigglefly (6)
  • SRM-Stickers (8)
  • techniques (191)
  • templates (26)
  • Tiffany-Doodles (4)
  • Tutorials (252)

Blog Archive

  • ►  2013 (16)
    • ►  July (4)
    • ►  June (4)
    • ►  May (3)
    • ►  April (1)
    • ►  March (1)
    • ►  February (3)
  • ►  2012 (53)
    • ►  December (2)
    • ►  November (2)
    • ►  October (1)
    • ►  August (3)
    • ►  July (2)
    • ►  June (5)
    • ►  May (7)
    • ►  April (8)
    • ►  March (9)
    • ►  February (13)
    • ►  January (1)
  • ►  2011 (74)
    • ►  December (1)
    • ►  November (5)
    • ►  October (10)
    • ►  September (9)
    • ►  August (12)
    • ►  July (5)
    • ►  June (9)
    • ►  May (2)
    • ►  April (6)
    • ►  March (7)
    • ►  February (4)
    • ►  January (4)
  • ▼  2010 (84)
    • ►  December (7)
    • ►  October (1)
    • ►  September (6)
    • ►  August (1)
    • ►  June (1)
    • ►  May (7)
    • ►  April (21)
    • ▼  March (3)
      • Book-page Mod Podge blossoms--(3D cherry blossoms ...
      • Felt-covered MFT 3x3 Easter Basket (a pictorial)
      • FINALLY, I can write to You!
    • ►  February (17)
    • ►  January (20)
  • ►  2009 (234)
    • ►  December (16)
    • ►  November (21)
    • ►  October (11)
    • ►  September (23)
    • ►  August (29)
    • ►  July (26)
    • ►  June (10)
    • ►  May (16)
    • ►  April (26)
    • ►  March (22)
    • ►  February (27)
    • ►  January (7)
  • ►  2008 (39)
    • ►  December (14)
    • ►  November (25)
Powered by Blogger.

About Me

Unknown
View my complete profile